|
|
|||||||||||||||||||||||||
This section allows you to enter and change all information about retail merchandise. The items entered in this section cannot be rented. If the item is ever to be rented, you should place it into the "Enter/Modify Rental Items" inventory section. There are two pages of information to be entered for each item in the merchandise inventory. Only a certain amount of this information is necessary to start using the system. The merchandise inventory is handled like a standard inventory. Items are assigned individual numbers, and a quantity in stock is entered for each item. This quantity is reduced when items are sold. The BizPie allows UPC (Universal Product Code) coded items to be recorded using the barcode reader (if used). The manufacturer assigned UPC code appearing on the item is now the number the system assigns to be used by the inventory.
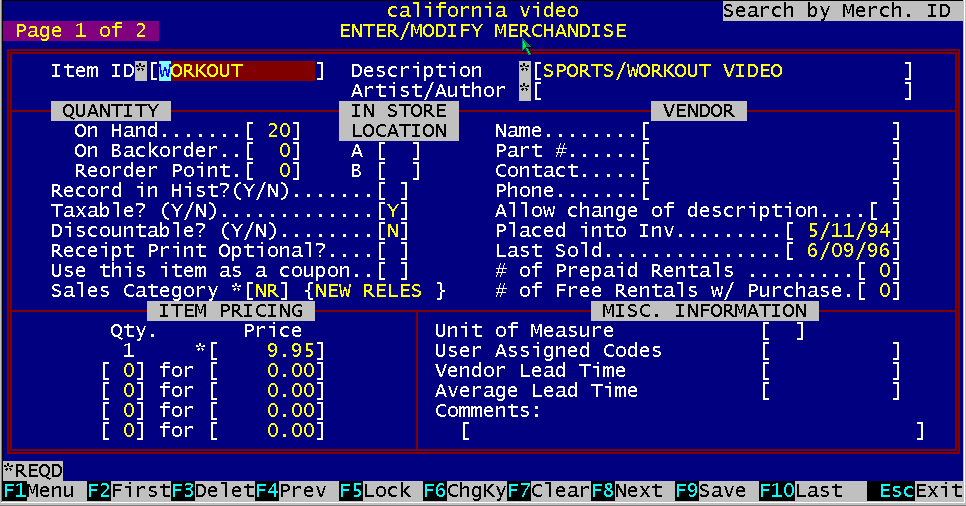
Figure 9.1 Screen Page 1 of 2
The first page of this screen has inventory information about each merchandise item. The required fields are designated by an asterisk (*). The other fields are not required, and can be entered at a later time.
The item number is the actual number from the UPC coded information of the item, or if none available, the assigned number. The BizPie checks to see if there is another item with the same number in the system, whether rental inventory or merchandise inventory. If there is another merchandise item assigned to this number, it will be displayed on the screen. Once the inventory item number is entered and saved, it can be changed only by using the "Function key F6". If another number is to be assigned to this item, you must first press F6 to indicate a "Change key" condition. Then enter the new ID you want to assign the merchandise item. When you press F9 to save it, it will change all references of the old ID to the new ID throughout the system. As in the rental inventory, each field is retained as a model for the next item. Thus you only need to change the fields that are different about each item, rather than having to reenter every piece of information for every item in the merchandise inventory.
Item description is used to describe the merchandise item in inventory. As in the rental item, once this field is saved, it cannot be changed. You must create another item with the correct description, and delete the incorrect item from inventory. If you don't remember the complete name or number of the item, you can enter as few letters of the name as you are able to. BizPie will search for the first item in inventory that matches these letters and display the full item on the screen. Most likely this will be the item you were searching for. If not, then you can use F4/F8 keys to scan the rest of the inventory.
Enter the appropriate quantities into these fields. Quantity On Hand will be reduced appropriately as the item is sold in POS.
If this item is taxable, enter "Y", otherwise you may leave it blank or enter "N'.
If this item is allowed to be discounted by the "Lookup Tables, Customer Plan" selection, you should enter a "Y". If you leave it blank, or if you enter "IV", this item will not be discountable.
Enter the item "Sales Category", as setup in the "Lookup Tables" section of the BizPie. This field will be used to create financial information about the merchandise inventory by "Sales Category" classification. "Sales Category" is also used in the daily summary report of the POS section. There is a sales by "Sales Category" report printed whenever the cash drawer is closed out (AltF9). This report breaks down the rentals and sales according to the sales category you have setup here. The more sales categories you assign to your rental and merchandise inventory items, the more detailed breakdown of the daily sales you will be able to have.
9.2.9 Number of Prepaid Rentals Enter the quantity of prepaid rentals this merchandise item will allocate to the customer's account when purchased at POS. The item pricing field will determine the cost of the prepaid item.
9.2.10 Number of Free Rentals with Purchase Enter the quantity of free rentals to be given if you allow a certain number of free rentals with a merchandise item purchase.
9.2.11 Item Pricing Merchandise You may enter up to five different price break levels. These numbers will be used in the PointOfSale section to correctly price this item based on quantity of purchase. The first pricing level is for quantity one. The second pricing line is for any quantity amount and any dollar amount. The dollar amount is the price for the TOTAL quantity, not the unit price. If you want to manually enter the price on the POS screen for an item, the "Quantity one" dollar amount must be set to zero. The POS system will now ask you to enter a price on the screen whenever a merchandise item, with the "Quantity One" dollar amount of zero, is sold on the POS screen.
To keep track of the Vendor for the item.
Enter the correct information into each of the vendor fields.
9.2.16 Date Placed Into Inventory Indicates the day this item was placed into inventory. Defaults to the current day and can be changed to any other date by overtyping. This date is used in inventory analysis reports.
Date of last sale for this merchandise item.
What quantity of units in which this item can be sold at.
This is a free form ten character field. This field can be used to assign any significance to each of the ten positions available. You can enter any alpha or numeric character into each position, or use this field for comments.
The number of days required by the vendor to ship a product after an order has been placed. Used in purchase order to generate reports.
The average time required to receive this item after ordering it.
Figure 9.2 Screen Page 2 of 2
The second page of the Enter/Modify Merchandise Items screen displays the sales history for the current year. The current period, quarter to date and year to date dollar and quantity values are displayed. There are no required data fields on this screen.
This is the same field as the one from Screen 1. You could modify this field and it will be reflected on screen one also.
9.3.2 Item Pricing Merchandise This is the same fields as on page one. They are here only as a convenience. You can change any of these prices and it will be reflected on page one also. See page one's description.
These are enterable fields, used to display current and previous sales information about this item. You may enter your beginning balance amounts in these fields. The system will thereafter keep track of these amounts as they accumulate. If you run the period and year end reset (see Management Menu choice 5 and 6 they will zero out these figures as required to start the new period or year.
9.3.4 Purchases from Customers If you purchase merchandise items from customers using the POS "Purchase" option, the amounts that you paid to the customer will be recorded here. There are two methods of purchases, Store Credits and Cash. Both of these are recorded on this screen.
The four pricing analysis fields display the cost, profit, margin and markup numbers.
This field is used to record the cost of the item.
9.3.7 Pricing Analysis, Profit This field designates the calculated profit in dollars.
9.3.8 Pricing Analysis, Margin This field designates the calculated profit in percentage
9.3.9 Pricing Analysis, Markup This field designates the calculated profit in percentage
|
|||||||||||||||||||||||||
|
|||||||||||||||||||||||||
|
|
|||||||||||||||||||||||||
|
|||||||||||||||||||||||||
| [BizPie] [About Us] [Sales Information] [Service] [What's New] [SiteMap] | |||||||||||||||||||||||||
Please contact our Webmaster with questions or comments. |
|||||||||||||||||||||||||