|
|
|||||||||||||||||||||||||
Passwords and Access Level protection provides a method of preventing unauthorized personnel from using the BizPie system. You may assign an "Employee ID" to a person, and optionally a "Password' with or without an 'Access Level". If you assign just an "Employee ID" to a person without a "Password" or without an 'Access Level", they will be asked for only their ID. If you assign an "Employee ID" and a "Password' without an 'Access Lever', they will be asked for their ID and password but will have unrestricted access to the system. If you assign an "Employee ID", a "Password' and an 'Access Level", they will be asked for their ID and password and will have restricted access to the system based on their 'Access Level'. This triple protection scheme will prevent anyone without the proper ID or password to use BizPie. Even with the proper password they will be restricted to areas assigned by the Access Level setup with their password. You do not have to use the Access Level field of each employee. If you leave it blank for a particular employee, they will have access to any part of the system if they enter the correct password. Access Levels have a range from 1 to 9. Level 9 is the least restrictive and level 1 is the most restrictive. Level 0 is the only exception. It permits anyone to have access to a function with a level 0. An example would be if a employee was assigned Access Level 4. They will not be able to access a menu choice or system activity which has an access level requirement of 5 or higher. They will be able to access any function that has a level 4 or less assigned to it. You can print the employee ID and Password on barcode labels in the "Management" section. This permits easy use of the ID's and password without having to type it in every time it's needed.
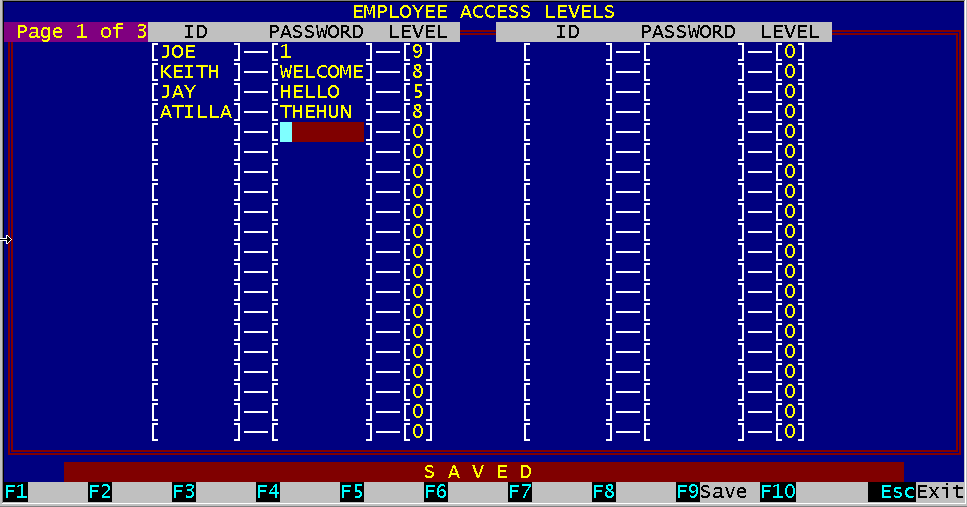
Figure 10.1 Screen Page 1 of 2
Each employee may be assigned an ID. If you setup BizPie to Require Employee ID's to start a transaction at the POS section (See "Enter/Modify Store Information"; Page 2), then you MUST assign an ID to all employees that will be using the POS section of BizPie. Employee ID will also be required to process the Bulk Return function. Employee ID's are recorded in the following areas:
Each employee that has an ID assigned may also be assigned a Password. Passwords are not required to be used. If you setup BizPie to Require Employee ID's at the POS section and you also have a Password assigned to that employee, BizPie will ask for the password before allowing access to that section of the system. NOTE: If you plan to use passwords, it is advisable to protect the "Enter/Modify Passwords" menu choice itself with a password and an access level.
Access levels permit you to restrict employees from having access to any part of the system. Access levels range from 0 to 9. We will show you an example of how the access levels are used. EXAMPLE: Referring to Figure 10.2 in the next page, Joe is the owner of the business, Keith is the store manager, and Jay is the store clerk, and Atilla is the clerk trainee. Since Joe is the owner, he would assign himself the password "1" and an access level of 9, the highest, which means he has access to any part of the system. Keith, the store managers, choose the password "welcome", and Joe assigns an access level number lower than himself. Let's give Keith a level 8. The clerk, Jay can choose his own password to use, and is assigned an access level lower than Joe or Keith. Joe assigns the clerk to be a level 5, and Atilla, the trainee, a level 4. The following page shows the different Employee ID's, pass words and access levels Joe just assigned.
Figure 10.2 Passwords and Access Levels example
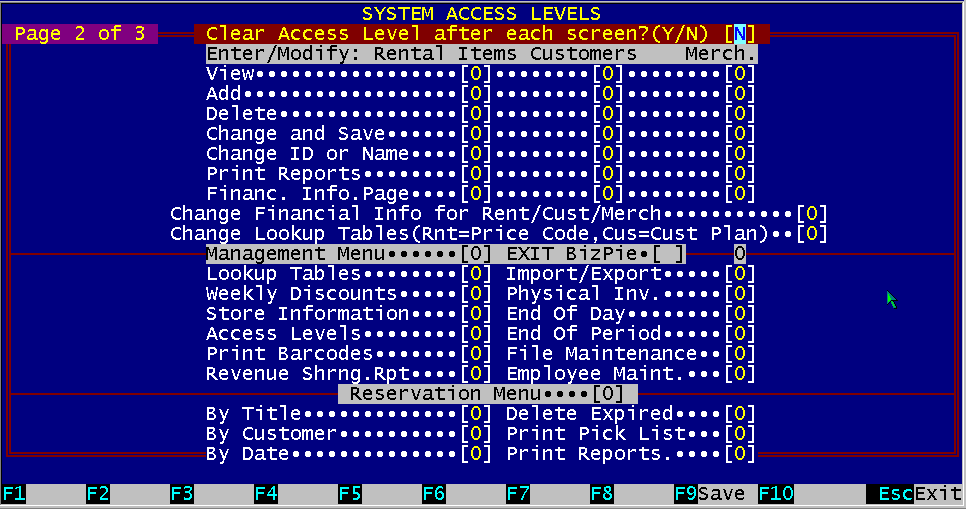
The access levels just assigned will be used to permit different employees to have different capabilities in BizPie. Screen Page 2 of 2 will show how the access levels will allow you to control what your employees do in the system. If passwords are used, it will be checked after employee ID verification. Then, at the same time, the Access Level is checked to see if they are authorized to be in the section or function they are trying to access. If they are not authorized, access will be denied. The access level is optional for each employee, just as passwords are. You MUST have a password for the access levels to function. If there is no need to implement a password security system, leave the password blank and the access levels zero for all employees. BizPie will allow all menu choices to be accessed by anyone using the system, but it will still ask for their employee ID. You can always add or modify passwords and access levels at a later date. BizPie is delivered with employee ID, passwords and access levels blank, thus the system is not password protected. Since the access levels are blank for all the menu choices, you have access to any part of the system.
Figure 10.3 Screen Page 2 of 3
NOTE: Leaving a menu choice Access Level at zero will allow anyone to have access to that menu choice or function.
There are two ways of clearing access levels. One is to let the system clear your password and access level automatically after you press ESC and leave a screen. The other is to clear the password and access level manually by pressing a key combination of ALT key and the F6 function key together. WARNING: If you answer "N" to clear passwords after leaving a screen, you have to remember to press ALTF6 to manually clear your password, otherwise anyone using the system later will have your access levels.
Enter an Access Level to permit viewing the Rental Item file, the Customer file or the Merchandise file. If an employee has an Access Level equal to or higher than the number you enter here, they will be able to view these files.
Enter an Access Level required to permit adding a new rental item, a new customer, or a new merchandise item. If an employee has an Access Level equal to or higher than the number you enter here, they will be able to add to these files.
Enter an Access Level to permit an employee to change and save the data in the Rental Item file, the Customer file or the Merchandise file. If an employee has an Access Level equal to or higher than the number you enter here, they will be able to change and save the data in these files.
Enter an Access Level to permit an employee to delete a record in the Rental Item file, the Customer file or the Merchandise file. If an employee has an Access Level equal to or higher than the number you enter here, they Will be able to delete a record in these files.
Enter an Access Level to permit an employee to change and save either the tape ID or name and the customer ID or name in the Rental Item file, the Customer file or the Merchandise file using the special "Function Key F6" (Change Key). If an employee has an Access Level equal to or higher than the number you enter here, they will be able to change the ID or name and save the data in these files.
Enter an Access Level to permit an employee to print reports in the Rental Item section, the Customer section or the Merchandise section of BizPie. If an employee has an Access Level equal to or higher than the number you enter here, they will be able to print reports in these sections.
Enter an Access Level to permit viewing the Rental Item files, the Customer files or the Merchandise files financial information screens. If an employee has an Access Level equal to or higher than the number you enter here, they will be able to view these financial information screens.
Enter an Access Level to permit changing the Rental Item files, the Customer files or the Merchandise files financial information screens. If an employee has an Access Level equal to or higher than the number you enter here, they will be able to change these financial information screens.
Enter an Access Level to permit entry into the Management Menu section of BizPie. If an employee has an Access Level equal to or higher than the number you enter here, they will be able to enter into the Management Menu section of BizPie. When an employee is in the management menu, they must have an Access Level equal to or higher than the number of the menu choices you enter here to access any part of the management menu section.
Enter an Access Level to permit exiting BizPie. This is ususally done to prevent an employee from changing the computer dates.
Enter an Access Level to permit entry into the Reservation Menu section of BizPie. If an employee has an Access Level equal to or higher than the number you enter here, they will be able to enter into the Reservation Menu section of BizPie. When an employee is in the reservation menu, they must have an Access Level equal to or higher than the number of the menu choices you enter here to access any part of the reservation menu section.
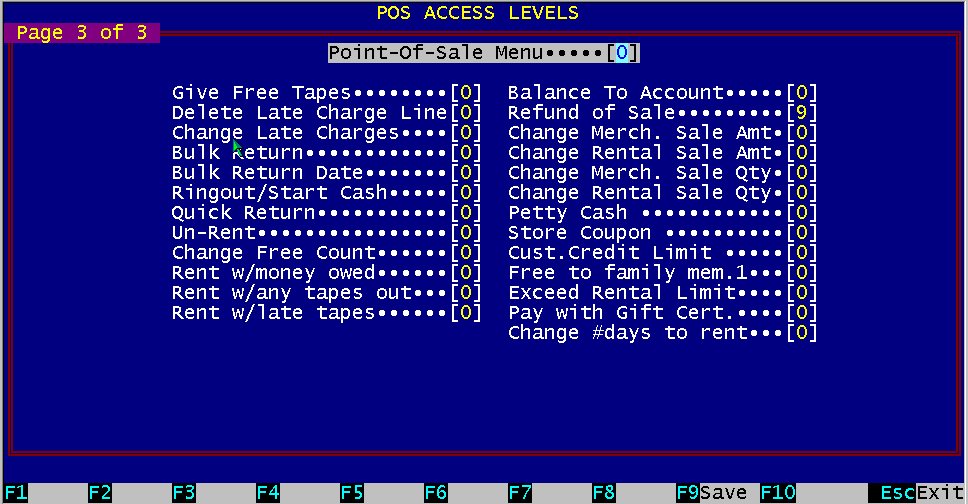
Figure 10.4 Screen Page 3 of 3
Enter an Access Level to permit entry into the POS Functions section of BizPie. If an employee has an Access Level equal to or higher than the number you enter here, they will be able to enter into the POS Functions section of BizPie. When an employee is in the reservation menu, they must have an Access Level equal to or higher than the number of the menu choices you enter here to access any part of the POS section.
Enter an Access Level to permit an employee to give free tapes to a customer who has not earned one. An example is if the customer returns a damaged tape and you want to give them another one without charge.
Enter an Access Level to permit an employee to delete late charges for a customer. You must also setup the "Enter/Modify Store Information" section to permit changes or deletions of late fees at POS.
Enter an Access Level to permit an employee to delete late charges for a customer. You must also setup the "Enter/Modify Store Information" section to permit changes or deletions of late fees at POS.
Enter an Access Level to permit entry into the Bulk Return section of BizPie. If an employee has an Access Level equal to or higher than the number you enter here, they will be able to enter into the Bulk Return section of BizPie.
Enter an Access Level to permit changing the Bulk Return Date in the Bulk Return section of BizPie. If an employee has an Access Level equal to or higher than the number you enter here, they will be able to change the Bulk Return Date.
10.4.7 POS Ringout/Starting Cash Enter an Access Level to permit entry into the POS Ringout screen, the AltF9 function at the POS screen. If an employee has an Access Level equal to or higher than the number you enter here, they will be able to enter into the POS Ringout section of BizPie at the POS screen.
Enter an Access Level to permit the "Quick Return" function. This function allows you to return a tape from a previous customer and check it out to the customer currently on the POS screen with one keystroke.
Enter an Access Level to permit the "UnRent" function. This function allows the customer to return a rented tape and exchange it for another tape. The previously rented tape will have all of its rental revenue, customer revenue, store total and sales tax collected be reversed, as if it never happened. The customer will now have a credit amount on the POS screen. This credit amount can either be placed on their account, or they can rent another tape on the same transaction to use up the credit.
Enter an Access Level to permit any changes to FREE count directly on the POS screen without having to go to the customer's record.
Enter the Access Level required to allow a customer to rent when their on account credit limit is exceeded.
Enter the Access Level required to allow a customer to rent when the maximum number of tapes out they are permitted to have in their possession is exceeded.
10.4.13 Rent with Late Tapes Out Enter the Access Level required to allow a customer to rent when a tape is late beyond the number of days limit you setup in the "Lookup Tables" under "Customer Plans".
Enter the Access Level required to allow a customer to balance to account at the POS screen.
Enter the Access Level required to allow a customer to be issued a refund of a sold item.
10.4.16 Change Merch Sale Amount Enter the Access Level required to allow changes the for sale amount on the POS screen for a merchandise item.
10.4.17 Change Rental Sale Amount Enter the Access Level required to allow changes the for sale amount on the POS screen for a rental item when it's sold.
10.4.18 Change Merch Sale Quantity Enter the Access Level required to allow changes the for sale quantity on the POS screen for a merchandise item.
10.4.19 Change Rental Sale Quantity Enter the Access Level required to allow changes the for sale quantity on the POS screen for a rental item when it's sold.
Enter the Access Level required to have the clerk place a petty cash line item on the POS screen.
Enter the Access Level required to have the clerk place a store coupon line item on the POS screen.
10.4.22 Exceed Cust. Credit Limit Enter the Access Level required to have the clerk exceed the customer plan credit limit for the invoice total on the POS screen.
Enter the Access Level required to have the clerk give a free item to other than the 1st family member if you have that setup in the Customer Plan.
Enter the Access Level required to have the clerk exceed the customer rental limit on the POS screen.
10.4.25 Pay with Gift Certificate Enter the Access Level required to allow the clerk to use the gift certificate key as the method of payment. |
|||||||||||||||||||||||||
|
|||||||||||||||||||||||||
|
|
|||||||||||||||||||||||||
|
|||||||||||||||||||||||||
| [BizPie] [About Us] [Sales Information] [Service] [What's New] [SiteMap] | |||||||||||||||||||||||||
Please contact our Webmaster with questions or comments. |
|||||||||||||||||||||||||