|
|
|||||||||||||||||||||||||
Figure 4.1 Function Keys and Numeric Keypad
Function keys F1 through F10 (F11, F12 are not used) and the Numeric Keypad are a shorthand way of telling Bizpie to perform a certain task. When any of these keys are pressed, they signal the
computer to start a preprogrammed sequence of commands. Bizpie has two major sets of assignments for these function keys. The first is for general purpose use which affects
maintenance sections of the system, such as "Enter/Modify Rental Items", "Enter/Modafy Merchandise Items", "Enter/Modify Customers", etc. The figure
labeled "General" is for the set of function keys that are used for all of the above menu choice options. There are a few menu choice sections where one or more of these keys are not
used. If these unused keys are pressed nothing will happen on the screen and no damage can result from its use. The second set of assignments for these function keys are for the
PointOf Sale section. This section reassigns all of the keys to perform different tasks than in the rest of the system.
The Numeric Keypad functions are common throughout the Bizpie system.
You'll note that the bottom line of every screen displays the available function keys for that particular screen.
If there is no designation for a function keys on the screen, then that key is not used.
We will now describe the purpose for each of the function keys and point out the differences and common usage of these keys. In the "General" section, we will be talking about the usage of these function keys as they affect everything except POS screen. In the "POS" section, we will be talking about these function keys only as they affect the POS operation.
4.3 Function Key Usage General
Figure 4.2 Function Key Usage General
Pressing "Function Key FTI will perform the following: "Enter/Modify Rental Item' A "PopUp" window appears giving you a "MiniMenu" of four more choices. Pressing F1: Analyze all copies of the title shown. It displays how many are owned, in, reserved, due in, etc. on line 24. Pressing F2: Enter how many additional copies of the displayed title you want to add. The item ID's added are in number sequence starting with the next number of the item displayed. Since it adds the new item in sequence you can use this function only if the item ID is all numbers. Pressing F3: Add new rental items simply by typing in the number or by scanning in a preprinted barcode label on the tapes. You don't have to press "F9" to save each item. Bizpie will save it automatically. Pressing F4: Print displayed history on the printer. This is a report of all customers whom have rented the currently displayed copy of the tape when displaying the "Rental Log" screen. "Enter/Modify Customers' Screen # 1, #2 and #3: A "PopUp" window appears giving you a "MiniMenu" of four more choices. Pressing Fl: Print a barcode label for the displayed customer using a printer with barcode labels in it. The size of the barcode label can be set in the "Management Menu" section,"Enter/Modify Store Information, page 6 of 6" part. Pressing F2: "PopUp" a full screen memo screen. You can type in any comment you want, then press F9 to save it. This comment will appear on the POS screen every time a customer's account is pulled up. Pressing F3: Display a picture of the customer that you have scanned in. Pressing 174: Scan in a picture of a customer, if you have a scanner in your computer setup properly. it will ask you which family member to scan a picture in for. You can save up to four family member pictures. . Screen 4: Pressing Fl: Print a report of customers 'Activity Log". This report will print every transaction that is kept in the customer's record based on the number of month you retain this information. Screen 5: Pressing Fl: Print a list of tapes currently out on rental or returned and late fees not yet paid for. In "Reservations" Print an individual reservation report either by tape title, or by customer name.
In "Enter/Modify Rental Item' The first item in the file is displayed based on the current search key in effect. An example would be in the "Enter/Modify Customers" section of Bizpie. If the cursor is in the Customer ID field. "Search by Cust. ID" is displayed as the search key in the top right corner of the screen. By pressing "Function Key F2", Bizpie looks at which search key is selected, thus the first customer in ID sequence will be displayed. If the cursor is in the customer last name field, "Search by Cust. Name" is displayed as the search key. By pressing "Function Key F2", the first customer in name sequence will be displayed.
Deleting a record from a file is accomplished by pressing Function key F3. The only item that will be deleted from the file is the currently displayed item on the screen. You will be asked to verify the deletion before it actually is deleted by the message
Figure 4.3 Deleting A Record Using F3 Function Key
Are you sure you want to DELETE this rental item? (Y/N)
You can verify your intent to delete by responding with a "Y" for yes, or abort the deletion by responding with an "N' for no.
If you respond with a "Y" (yes), the item will be deleted. It will be permanently removed from the file. If you respond
with an "N' (no), the item will not be deleted and it will remain displayed as is on the screen.
If the item is a rental tape that is currently out on rental, you will not be able to delete it (status RNT.;i The only exception to this method of deleting is the
"Lookup Table" codes. Pressing Function Key F3 will ask you if you want to mark it as "Deactivated',
rather than deleted. If you say "N", you will be asked if you want to "Delete"
it. If you say "Y", this lookup table will be deleted. If you say "Y" to deactivate it, by pressing Function Key F3 again, it will "Reactivate"
it. While marked as "Deactivated', these codes will not be used by the system.
When "Function Key F4" is pressed, the previous item in the file is displayed based on the current search key in effect. As an example, if you are in the "Enter/Modify Customers" section of Bizpie, pressing "Function Key F4" will display the previous customer ID number in the file if the "Search by Cust. ID" is displayed on the top right part of the screen.
Bizpie has certain fields called "search" or "key" fields. This method of searching through the files is performed instantly. There is no sorting required at all using this type of key fields. You enter numbers or letters into a search field when entering a new item. For example in the "EnterlModify Rental Items" section, there are three "search" (or key) fields. They are: Bizpie automatically "sorts" every entry when it's saved using these three key field entries. Therefore, the latest item entered is available instantly in its proper numeric or alphabetic sequence. You never have to sort any of the files with this method of saving the key fields. This means that as soon as you save a new item, you can search for it by any of these three key fields just mentioned.
Example: There are currently three tapes in the rental item file with the numbers 1000, 1001, 1002 and with the titles
"Always" "Charlie Chan" and "Bullit", respectively. Note that the title names are not in the same sequence as the tape numbers.
Thus the number sequence is: 1000 (Always), 1002 (Charlie Chan), 1003 (Bullit) and the alphabetic sequence is: Always (1000), Bullit (1003), Charlie Chan (1002)
You now want to add a new tape using the next available sequence number 1004 with the title "Dune". As soon as
you save this new record in the rental tape file, Bizpie instantly sorts it and places the number 1004 after tape number 1003 and places the title "Dune" after
"Charlie Chan". Thus the new number sequence is:
1000 (Always), 1002 (Charlie Chan), 1003 (Bullit), 1004 (Dune) and the alphabetic sequence is: Always (1000), Bullit (1003), Charlie Chan (1002), Dune (1004)
Thus when pressing any of the search function keys F2, F4, F8, or F10, and depending on which search field is in use,
the system will display the next tape according to the search field you selected.
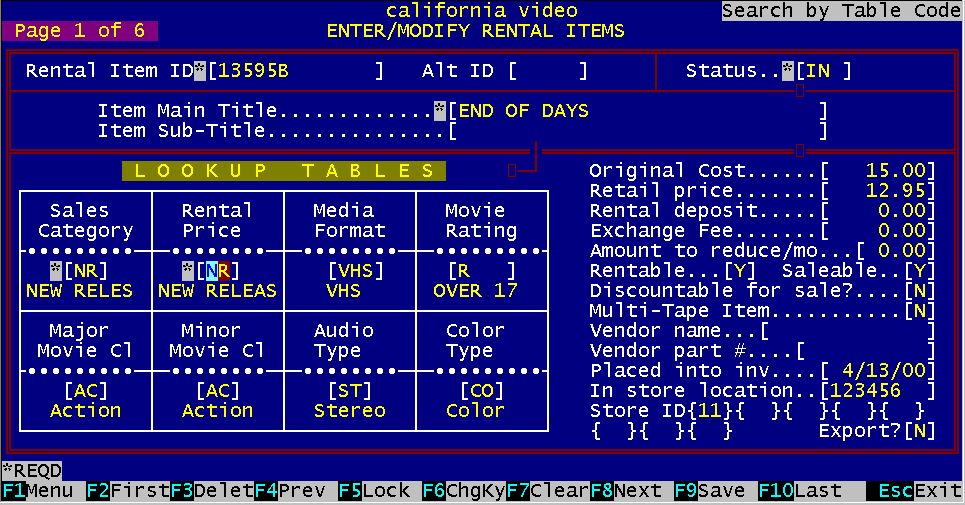
Figure 4.4 "Search by Rental No." indicator
If the search field is
"Search By Rental No.", when function key F2 is pressed the first tape in the file is displayed:
1000. When F8 is pressed (show next item), the next tape in the file is displayed: 1001. If F8 is pressed again, the next tape is displayed: 1002.
There are several fields throughout the Bizpie system that can be searched by this "Key". As you go through these key
fields by moving the cursor into these fields, you will see an indicator on the top right hand corner of the screen that displays the current search field in effect.
Lets say you want to search the movie file by Item Numbers so you can make a change on many tapes within a range of item numbers. You can move the cursor to the
"Rental Item #" field and start searching through the file for the tape you are looking for. When you find it, you move the cursor to the field you want to change.
Lets say you want to change the "Rental Price" field. After changing this field, you now want to display the next "Rental Item #" to change the next tapes
"Rental Price".
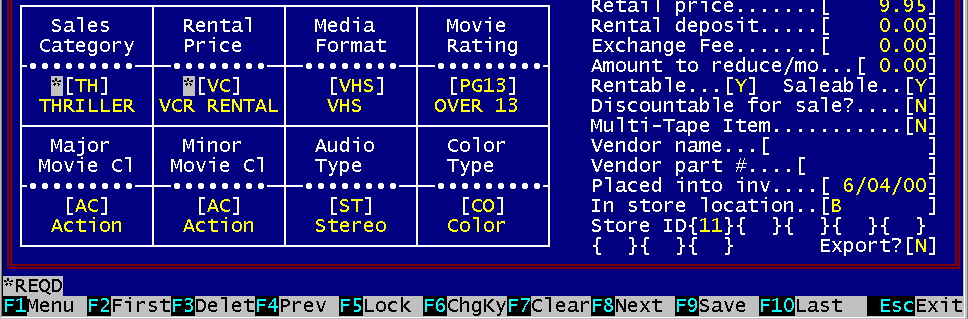
Figure 4.5 "Search by Lookup Table" Indicator
Going through the "Lookup Table" fields to get to the "Rental Price" field, the message on the top right part of the screen displaying the message
"Search by Rental No." was changed to "Search by Table Code". This is because all eight "Lookup Table" fields are key fields.
You can use Function Key F5 to lock this "Search by Rental No." message on the top right screen in order to maintain the search by the "Rental Item #".
By pressing Function Key F5 while in this field, the search key field will be locked. A new message "Is now Locked' will be displayed under the "Search by Rental No."
message. With this locking method you can quickly move through all the tapes you want to change. You won't have to go to the
top of the screen every time a new tape is displayed to search for the next sequence numbered tape.
If you have the search key locked and you are now in a valid key field (other than the one locked), pressing Function Key F5 will
now release the locked key field and set the search key field to the current position of the cursor. At this point you may press Function Key FS
again to lock the search key field to the currently displayed one. You may lock the search field only for four types of fields. They are the
"Rental Item #", "Main Title", "SubTitle". Although you may also lock the "Lookup Table"
fields, you cannot search by them. They will only display within the window you are in.
Figure 4.6 "Search By Rental No. Is Now Locked" As you can see,
"Function Key FS" is like an onoff switch. Press it once, it locks the search key field, press it the second time, it unlocks the search key field.
"Enter/Modify Rental Item" "Function Key F6" allows modifying the "Search Key" fields of Rental Items in Bizpie. As described previously, the "Key" fields are used to search a file for a record. Key fields are the "Rental Item ID" and "Item Main Title"."Enter/Modify Customers' "Function Key F6" allows modifying the "Search Key" fields of Customers in Bizpie. As described previously, the "Key" fields are used to search a file for a record. Key fields are the "Customer ID" and "Customer Name".If you have to change any of these two fields after you saved the new record, either because of misspelled name or entered the wrong ID number, you must indicate this change with the use of a special key, "Function Key F6". First you display the item to be changed, then press F6 function key. Now you will see the words Change Key in the upper left corner of the screen. After you made the corrections, press F9 to save the new data. The bottom of the screen will say WARNING Changing Keys may take several minutes. Proceed? (Y/N) This message means that Bizpie searches throughout the system to find the old Tape ID or Tape Name or Customer
ID or Customer Name and change it to the new one. If there was a lot of rental activity for this tape or customer, each record that is in the system has to be changed.
NOTE: If the rental item has been rented out more than one time, you will not be able to change the "Rental ID". You may still change the title.
Function Key F7 has two purposes in the General Section of Bizpie system. Clear the screen Pressing function key F7 clears the screen of all data only when you are adding a new item in the "Enter/Modify Rental Items"; "Enter/Modify Customers" and "Enter/Modify Merchandise". To indicate a new item is being added, the words "New record' appears in the top left corner of the screen. Bizpie's "Modeling" capability retains most of the previous item's data on the screen when you create a new record. Sometimes it's more tedious to change every field of a new record than clearing the screen and entering everything new. "Reservation" Pressing function key F7 in the "Enter/Modify Reservations" section, "Reservations by Tape" part will display the complete status of the rental item at the bottom of the screen. The status displayed will show the following information: 1. date of status to be checked 2. number of copies owned on that day, which includes copies with the status of "ORD" (on order, not yet received) due in that day 3. number of copies reserved 4. number of copies available to be reserved, based on the total copies of this title in the store that day including rental items currently out, but are due to be returned that day.
When "Function Key F8" is pressed, the next item in the file is displayed based on the current search key in effect.
As an example, if you are in the "Enter/Moclify Customers" section of Bizpie, pressing "Function Key F4" will display the next customer ID number in the file if the "Search by Cust. ID" is displayed on the top right part of the screen.
4.3.9 Function Key F9
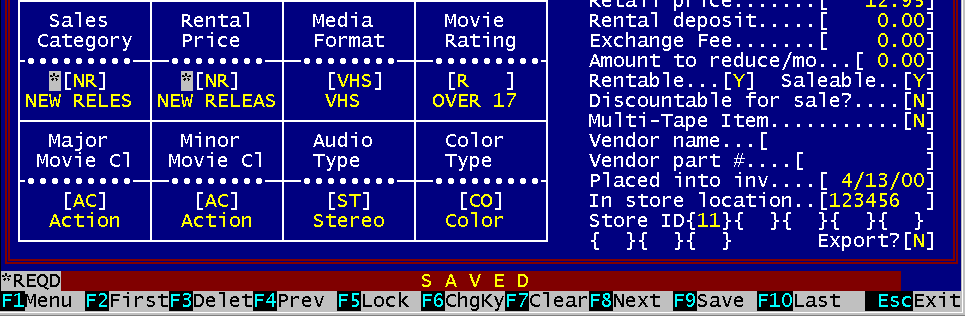
"Function Key F9" is used to save any changes you have made to the displayed screen. Any changes to the other pages are saved as well if there are multiple screens.
Figure 4.7 "SAVED" Message
A safety warning is provided against inadvertent loss of data when modifying information on a screen. The system will
detect any changes to the data on the current screen, including its multiple pages which are not displayed until you press "PgUp" or "PgDn".
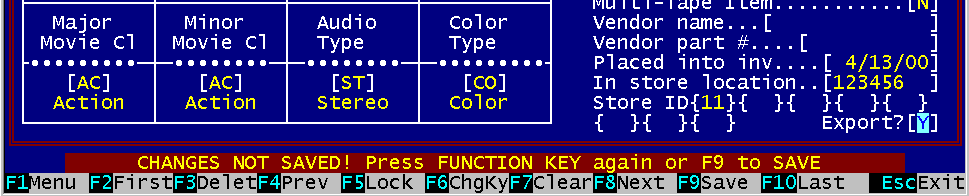
If do not want to save any of the changes, you can always abandon whatever modifications you have made on the screen, and still have the original data intact.
Figure 4.8 "Current Changes Not Saved" Message
If you press any of the function keys that will display a different record in the file (F2, F4, F8, F10) or take you to
another menu choice (Esc), a warning message will flash on the 24th message line.
This message warns you that you have not saved the changes you made to the data on the currently displayed screen, or one of the multiple pages of the current screen.
To continue, your choices are to:
1. Press F9 to save the changes 2. Press the same Function Key again to abandon the changes.
3. Press any one of the cursor movement keys (e.g. arrow keys) to cancel the action and remain on the same screen. NOTE: If there are multiple screen pages of data, Function Key
F9 will save the data on all the pages of an item.
When "Function Key FIO" is pressed the last item in the file is displayed based on the current "Search Key" in effect. As an example, if you are in the "Enter/Modif y Customers" section of Bizpie, pressing "Function Key FIO" will display the last customer ID number in the file if the "Search by Cust. ID" is displayed on the top right part of the screen.
Figure 4.9 Numeric Keypad The "Numeric Keypad' is used to position the cursor on the screen to allow data entry and certain editing functions to be performed quickly and to allow numeric data entry similar to a calculator. These keys work the same way throughout the Bizpie system.
Bizpie remembers which part of the system you were using before the currently displayed screen. The key labeled "Esc" is used to allow you to return to the previous section that was in use anywhere in the system. As an example, suppose you were using the "Enter/Modify Rental Items" section of Bizpie, and you press "Esc" key. You will immediately be taken back to the "Main Menu". If you are in the "Main Menu" section, pressing "Esc" key will take you back to the "Bizpie" logo screen. Pressing 'AltFl' will take you out of the Bizpie main program and into the "Startup Menu".
The "Home" key is used to position the cursor to the first field on the top left hand corner of the currently displayed screen. It's used to quickly move to the first field without having to move through all the other fields. As an example, the cursor is in the "Enter/Modify Rental Items" screen page # 1, "Vendor Part #" field. You now want to position the cursor to the "Rental Item ID", which is the first field on the screen. Pressing the "Home" key will move the cursor instantly to this field, rather than having to move the cursor through all the other intermediate fields to get there.
This key moves the cursor to the nearest, first available field above the current line position. If the first available field is not directly above the current cursor position, it is moved to the most logical choice of fields above the cursor. If the cursor is on the top line of the screen, it will "roll over'' to the nearest, first available field on the bottom of the screen. The POS screen is the only exception to this kind of movement.
This key moves the cursor one character position to the right within a field. In certain fields where appropriate, when the last character position within a field is reached, the cursor will automatically go to the first character of the next field, either on the same line or the next line.
This key moves the cursor to the nearest, first available field below the current line position. If the first available field is not directly below the current cursor position, it is moved to the most logical choice of fields below the cursor. If the cursor is on the bottom line of the screen, it will "roll over" to the nearest, first available field on the top line of the screen. The POS screen is the only exception to this kind of movement.
This key moves the cursor one character position to the left in a field. In certain fields where appropriate, if the first character position within a field is reached, it will automatically go to the last character of the previous field, whether on the same line or the previous line.
This key works only with screens that have multiple pages of data to display about a single item. Pressing this key will clear the display of the current page and will show you the previous page. The data in this page will not be lost when displaying the other pages of the same item. The page number you are currently working with is always displayed on the top right hand side of the screen. The "PgUp" key is a "wrap around' key. As an example, if the current page is # 1 and there are four pages (E.g.: "Enter/Modify Rental Items"), pressing the "PgUp" key will now display the previous screen, which is screen page #3.
This key works only with screens that have multiple pages to display about a single item. Pressing this key will clear the display of the current page and will show you the next page. The data in this page will not be lost when displaying the other pages of the same item. The "PgDn" key is a "wrap around" key. As an example, if the current page is # 1 and there are four display pages, pressing the "PgDn" key will now display the next screen, which is screen page #2. Function Keys Numeric Keypad The page number you are currently working with is always displayed on the top right hand side of the screen.
This key blanks out the data in the current field to the right of the cursor position. It's used to quickly erase unwanted data in a field, rather than have to use the space key.
This key places the cursor editing into "Insert Mode". Press it once, "Insert Mode" is on, press it again, "Insert Mode" is off. In the "Off' position you are in the "Overtype Mode". This mode will replace anything typed over an existing character. When the "Insert Mode" is in effect, the block cursor will now change to a blinking line above and below each letter. It will remain this way as long as you are in the "Insert Mode". In the "Insert Mode" any character entered in a field will move all other characters to the right one position within that field to make room for this new character. If a character at the end of this field is moved one position beyond the right side of the field limit, it will disappear and will be lost.
This key will delete the current character at the cursor position on the screen and move all other characters left one position to fill the gap. The character deleted is permanently removed, and has to be type in again to recover it. The "Insert Mode" key can be active (on) while the "Delete" key is used.
Function keys F1 through F10 perform different tasks in the TOS' section than they did in the "GeneraP' section.
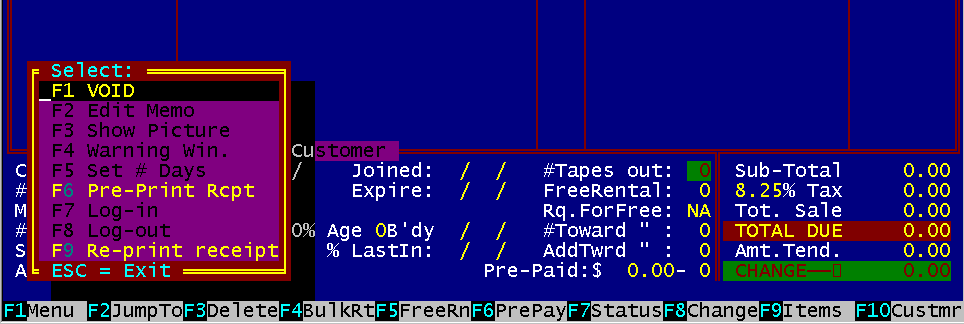
Figure 4.10 POS F1 "PopUp" Menu
When this key is pressed, a "MiniMenu" appears. You now have four choices from this menu. Pressing Fl: VOID any current transaction displayed on the screen upon verification by you. You are given a second chance not to void a transaction by the message: Are you sure you want to CANCEL this transaction? (Y/N) If you respond to this question with a "N', you will be placed back to exactly where you were before pressing this key and nothing will be lost. If you respond to this question with a "Y", the screen will be cleared of all data and a new transaction can be started. Pressing F2: Popup the full screen memo for you to edit. While you are editing the memo, pressing F3 will delete the memo, and F9 will save the changes in the memo. ESC will loose all the changes you just made, keeping the original. Pressing F3: If this customer has a picture on file, it will be displayed. You will be asked which family member to display. Pressing 174: Set the number of days to rent tapes if different than the defaults. This feature operates by placing the cursor on the line where you want to change the number of days to rent. Then press Fl to get the "MiniMenu" and then press F4 to select the number of days. All the tapes on and above the cursor will have the number of days set to whatever you choose. Any tapes below the cursor will not be changed. This way if you have five tapes on the screen, and want to change the number of days only on the first three, just position the cursor on the third tape then select the number of days.
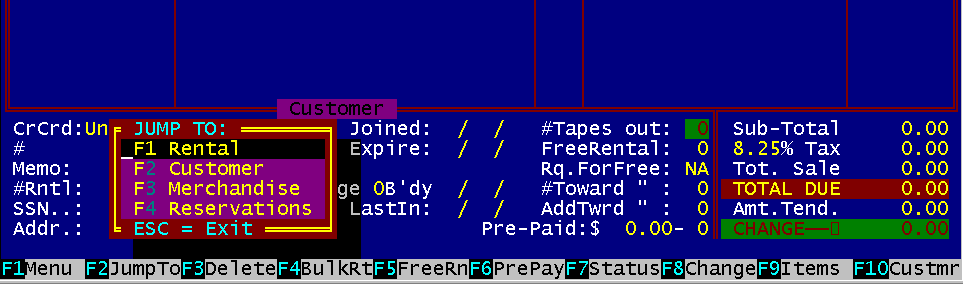
Figure 4.11 POS "Jump To Screen" function keys
Function Key F2 displays a "PopUp" screen of four different "Enter/Modify" screens to jump to. By pressing one of the four function keys again, or moving the cursor to it, you will "Jump To" the appropriate "Enter/Modify" sections of Bizpie. After you're done, pressing the "ESC"' key will return you to the "POS" screen, to continue exactly where you left off. You can press "F2" while the cusror is at any point on the POS screen. The following describes the four options after pressing the appropriate function keys (F1F4). Pressing 171: "Jump" to the "Enter/Modify Rental Items" section from the POS section. Before the system takes you to the rental inventory screen, the password and access level that's currently in effect is checked against the password required by the rental inventory section (as setup in the password section). If the passwords are the same, you may use the rental inventory section to add, change or delete items. If your 'Access Level" does not match, the system will let you only view the rental inventory items. You will not be able to make any changes, deletions, or additions to the file. Pressing the "ESC" key will return you to the POS screen. Pressing F2: "Jump" to the "Enter/Modify Customers" section from the POS section. If the 'Access Level" used to enter the POS section is the same one as required by the "Enter/Modify Customer" section, you will be able to make changes to anything in the customer file, as if you went directly to it from the main menu. If the 'Access Level" used to enter the POS section does not match the one required by the "Enter/Modify Customers" section, you will not be able to make changes to anything in the customer file. You will be able to only view the customer file and you will be able to only ADD new customers. Once you save the new customer record, you will not be able to change it without the correct password. Pressing the "ESC"' key will return you to the POS screen. Pressing F3: "Jump" to the ''Enter/Modify Merchandise" section of Bizpie. If the Access level used to enter the POS section is the same one as required by the "Enter/Modify Merchandise" section, you will be able to make changes to anything in the merchandise file, as if you went directly to it from the main menu. If the Access level used to enter the POS section does not match the one required by the "Enter/Modify Merchandise" section, you will not be able to make changes to anything in the merchandise file. You will be able to view the merchandise file only! Pressing the "ESC" key will return you to the POS screen. Pressing F4: "Jump" to the "Enter/Modify Reservations" section from the POS screen. If the Access level used to enter the POS section is the same one as required by the "Enter/Modify Reservations" section, you will be able to make reservations, as if you went directly to it from the main menu. If the Access level used to enter the POS section does not match the one required by the "Enter/Modify Reservations" section, you will not be able to make reservations. You will be able to view the reservations only! The name of the person to make reservations for will be retained in the reservation section, if there is already a name displayed on the POS screen. You may select any other customer by either entering their ID number or their name. Pressing the "ESC" key will return you to the POS screen.
This function key will remove one line item from the POS screen at the cursor position, and move up any following line items to where the deleted line was. This does NOT delete the rental item from inventory. All money amounts will be backed out of the POS screen totals. If permitted in the "Store Setup" and in combination with the "Passwords/Access Levels" setup part of Bizpie, "Function Key F3" will also remove "Late Charges" from the POS screen. If a late charge is deleted from the screen and the transaction is completed, it will be permanently lost and no record of the deletion will be kept. "Function Key F3" will remove an "On Account Charge" from the POS screen, but will NOT remove the amount owed by the customer from their record. Thus the next time they come in to the store, the amount of money they owe you will appear on the POS screen again.
"Function Key F4" will jump to the "Bulk Return" screen. This is the same screen as the one in the "Main Menu". Pressing ESC will return you to the POS screen.
"Function Key FS" is used to mark a rental item as "FREE" when pressed. If pressed again, it will unmark the rental item and place the correct rental fee amount back on the POS screen.When the rental item is marked as "FREE", the rental price from the line of the rental item will be replaced with the word "FREE', and the dollar amount from the totals of the transaction will also be removed. If the "Store Setup" permits you to give free tapes without the customer having earned one, you can do so. This feature can be password protected with an access level assigned to it in the "Enter/Modify Passwords & Access Levels" section of Bizpie.
Mark a rental item as "PrePaid' if the customer has prepaid amount remaining in their account. If pressed again, it will unmark the rental item as "PrePaid' and place the correct rental amount back on the screen. When the rental item is marked as "PrePaid', the rental price from the line of the rental item will be replaced with the word "PREPAID", and the dollar amount from the totals of the transaction will also be removed. The "PrePaid' feature can also be used to pay for a late fee by moving the cursor onto the late fee line and pressing "Function Key F6". The prepaid count and prepaid dollar amount will be deducted from the customer's account. This amount is displayed on the POS screen, and will be printed on the receipt.
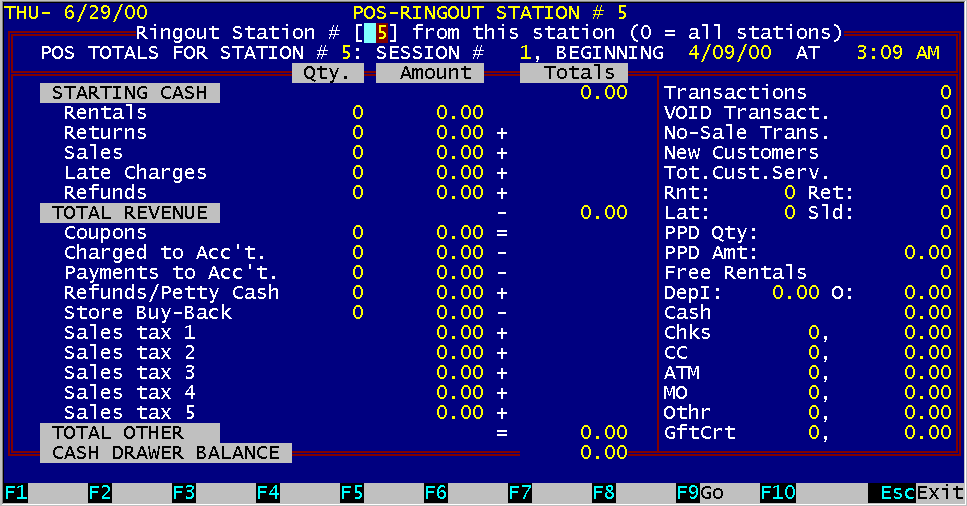
This function key will display a "MiniMenu". Pressing Fl will display the "POSRingout" screen for end of day processing of the workstation (See Ch.4).
Figure 4.12 AltF9
This function key placed the cursor into the appropriate field on the POS screen to modify the RNT type to be BUY if the customer wants to purchase a rental item. In a multistation system, the cash-drawer total is only for the station number displayed on the top of the screen. This information is an up to the minute summary of the daily cash drawer transaction totals and store activity. This screen may be displayed anytime throughout the day to get a "snapshot" of the store activity. To return to the POS screen, press the "Esc" key. For a full explanation of clearing the cash drawer totals, see Chapter 12, PointofSale, and Chapter 17, Endof Day processing. . "Function Key F8" is also used to change the number of days of rental, the quantity (QTY) or price of a merchandise purchase. "Function Key F8" is also used with the "UnRent" feature. It will move the cursor to the "Type" field where you can overtype RET with UNR. This will trigger the "UnRent" feature of Bizpie. A more detailed description of the "Unrent" feature is available in the POS section of Bizpie.
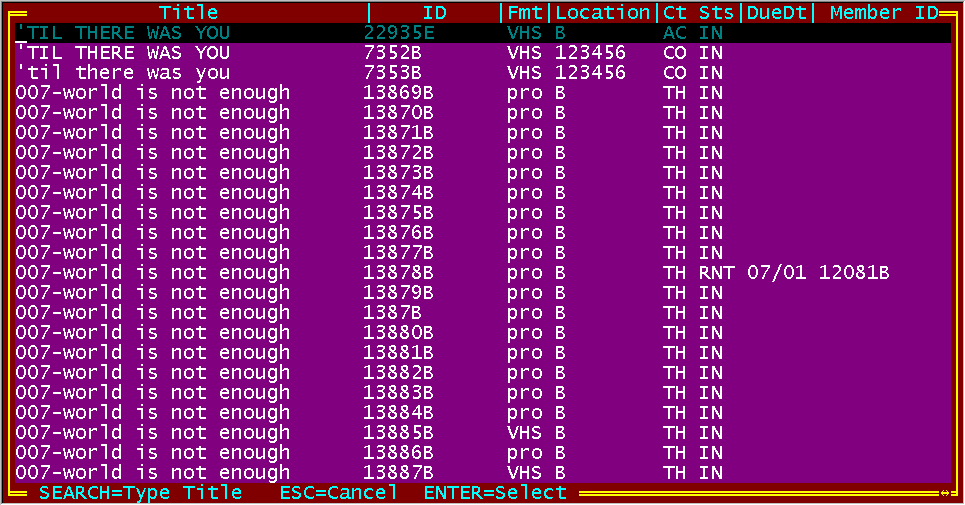
Figure 4.13 POS Search for Rental Item Status
"Function Key F9" will "PopUp" a screen of rental items.
You can enter as few letters of the item as you want and after you press r (Enter), Bizpie will search for the closest spelling name of the title. By pressing the "Down /Up Arrow"
or the "PgDn/PgUp" key, you can search for the title before or after the one displayed. The following information is displayed in the "PopUp" window:
Items title
4.14 F10 Enter Customer Name Direct
Depending on which field the cursor is positioned in, pressing function key "FIO" once allow you to search for a customer as follows: C'ust. Phone: Displays customers by phone number sequence. Cust. Name: You can enter the customer's name directly on the POS screen, last name separated by a comma and then the first name. The first name is optional. If you don't know how to spell the customer's name, you may enter as few of the first letters of the last name as you know and then press ' (Enter). Bizpie will find the first name that comes closest to the spelling you have entered. If the name field is blank, pressing "Function Key FIO" the second time will "PopUp" a screen of customers starting with the letter "A". You can now search for the customer by pressing the "PgUp" or "PgDn" key to display the next or previous pages of customers. Then by scrolling to the one displayed on the screen and pressing J ENTER, you have selected the customer for the transaction. The customer that is displayed in the customer name field and left there, will be the actual customer that will conduct the transaction. While this popup window is displayed, you can search for a customer by name. To quickly position the screen to the customer's name that's closest, just start typing in the name and another small window will pop up so you can enter the name of the customer you want to search for will appear. When it finds the closest spelling, it will place that customer on the top line of the "PopUp" window, with the next twenty customer's following it displayed.
Figure 4.15 POS F10 "PopUp" Customer Search
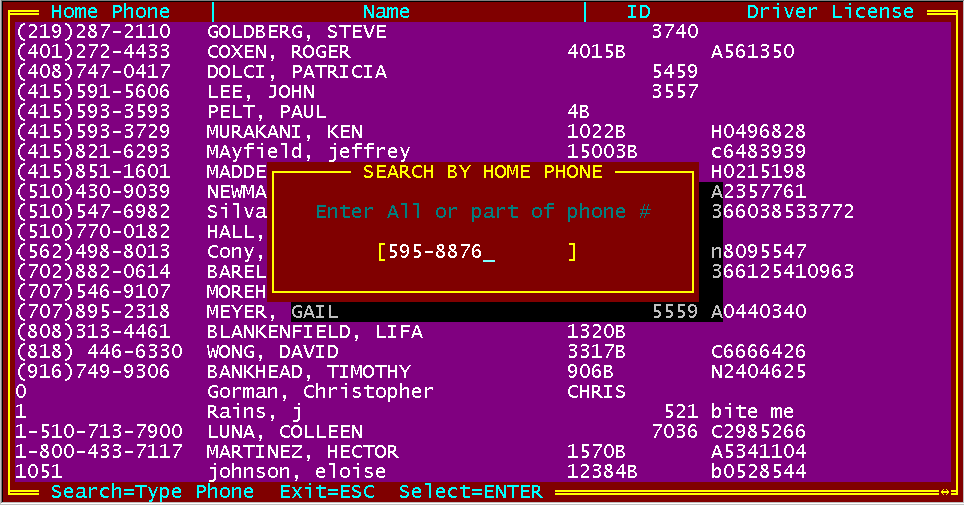
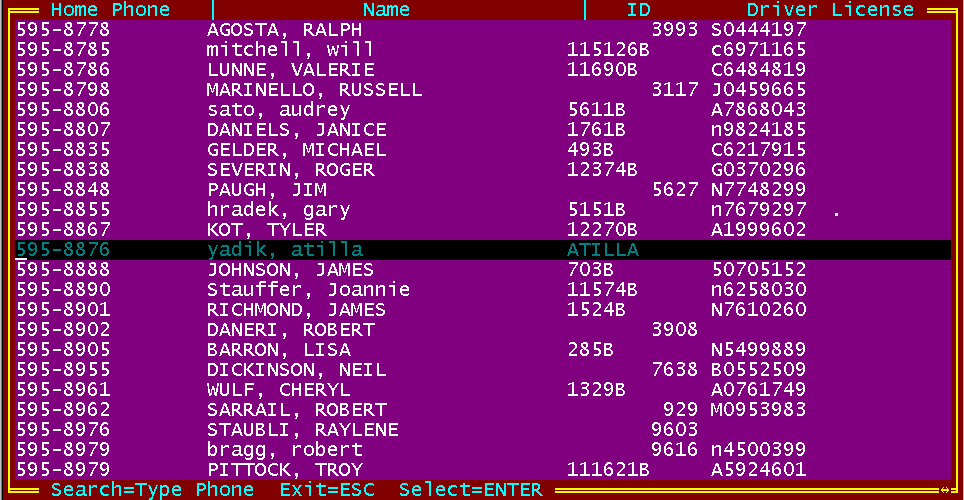
By pressing the "Down Arrow/Up Arrow" or the "PgDn/PgUp" (page down/page up) key, you can search for the customer before or after the one displayed. The following information is displayed in the "PopUp" window: Customer name If the cursor is in the "Customer Telephone" field and you press "Function Key F10", a "PopUp" window will be displayed showing you the customers in phone number sequence, including duplicate phone numbers. You can then enter the customer's complete phone number, or just the first few digits. When you press J ENTER, the screen will show you the exact match, or if there is no such number, the next closest match. You can now scroll forward or backward with the "Up/Down Arrow" or press "PgUp" or "PgDn" to see more customers. If you now press Enter, the customer highlighted on the cursor line will be put on the POS screen.
Figure 4.16(a) Search by Telephone Number
Figure 4.16(b) Search by name
4.5.11 Page Up, Page Down Keys When the cursor is in the Customer Name field, you can search for a family member (up to four members) within a Customer Record by pressing Page Up or Page Down function keys. Page Up will display the next family member and Page Down will display the previous family member in the Customer The family member that remains in the Name field will be recorded as the family member to rent in the transaction file and on the receipt using the main family members' ID.
|
|||||||||||||||||||||||||
|
|||||||||||||||||||||||||
|
|
|||||||||||||||||||||||||
|
|||||||||||||||||||||||||
| [BizPie] [About Us] [Sales Information] [Service] [What's New] [SiteMap] | |||||||||||||||||||||||||
Please contact our Webmaster with questions or comments. |
|||||||||||||||||||||||||