|
|
|||||||||||||||||||||||||
This is the first section of the BizPie program that should be used. In order to effectively use this program, you must tell the system about the way you manage the store. This section allows you to inform BizPie how the store is managed. This chapter allows you to customize the system to the way you want to operate the store. There are many choices that must be made before you can use the software effectively. You must decide on many variables that interact. Any of the setting may be changed anytime at a later date if you are not sure of the effect.
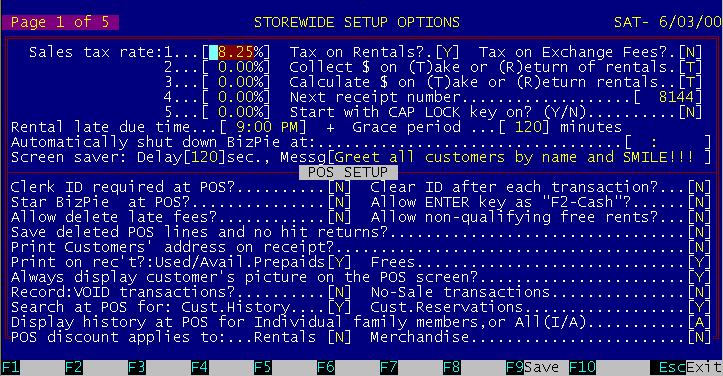
Figure 5.1 Store Screen Page 1 of 5
5.2.1 Setup Storewide Information. This screen is used to enter storewide information.
There are five sales tax rates that can be entered. These rates will be assigned in the "Lookup Table", section in "Sales Category" part. There are two assignements for sales tax rate used in the sales category lookup table. The first one is the rate to charge when a rental item is rented and the second one is the rate to charge when a rental item is sold. Enter the sales tax rates in effect. If the sales tax rate changes, you can modify this field any time to reflect the new rate. This sales tax will be applied to any item in either rental or merchandise inventory marked as taxable. NOTE: Sales tax is rounded to the nearest penny! If the tax is less than 1/2 cents, its removed, and if its more than 1/2 cent it is raised to the next penny. If you collect sales tax on rentals, enter "Y". Sales tax will also be charged for late fees if you answer yes to this question.
If you collect sales tax on exchange fees, enter "Y". Exchange fee is a charge when rental items are purchased and then returned for exchange of another rental item, such as a video game.
5.2.4 Collect Rental Fees Takes/Returns This field will determine if BizPie collects the rental fees when the tapes are taken or when they are returned by the customer. If you setup the store to charge rental fees when the customer takes the tapes, BizPie automatically calculates late fees if the rental items are late when returned (See exceptions in POS). This method of setup will still allow you to have customers place charges on account to be paid when rental items are returned. Also in the "Lookup Table" section, the 7 x 7 pricing grid will be in effect. If you setup the store to collect rental fees when the customer returns the tapes, the rental price is established based on the setup of the next option.
5.2.5 Calculate Rental Fees Takes/Returns Calculate rental fees when the customer takes rental items is the standard method used by a majority of video stores. Customer pays you when the tapes are taken. This method use the 7 x 7 grid in "Rental Price" setup of the "Lookup Tables" section. Calculate rental fees when the customer returns the rental item will allow you to have a fixed price set when the tapes are rented. This price can be set using the 7 x 7 grid or the 1 x 7 grid. If you are using the 1 x 7 grid, every day is a rental day. When these rental items are returned, the rental price is determined by the number of days the tape is out times the price based on how many tapes were rented. This method will not charge any late fees because every day the tape is out will be considered a rental day. The "Lookup Table" section of the system, the "One Day" column will be the only one in effect.
This number is the receipt number that will be printed on the receipt when BizPie is started up the first time. When you are ready to start using the system, use this field to enter a beginning receipt number to print. The receipt number is incremented only if there is a physical receipt printed! If you choose not print a receipt for rental returns when there is no money due, the receipt number will not be incremented. BizPie has a "Transaction Register" which is printed from the "Management Menu", "End of Day" processing (Ch. ,P. .) This transaction register has a sequential number (transaction number) that is independent of the receipt number. The transaction register will record all system activity, regardless of whether a receipt is printed or not, if you elect to collect this information as setup in this section, on page 15.
5.2.7 Start with CAP LOCK key on? (Y/N) Force BizPie to use all capital letters for data entry.
5.2.8 Due Time For Rental Returns Enter the time of day and AM/PM for when you consider rental items overdue. BizPie automatically calculates the late charges when the store is setup to charge for rentals when the tapes are taken. Even though these late charges are automatically calculated and placed on the POS screen when rental items are returned late, there are many options available to allow you not to charge all, or part of the late fee displayed on the screen. These options are explained in detail in the PointOfSale section. This "Due Time" is considered to be a storewide due time which applies to all rental items! BizPie provides an alternate due time for rental item returns which is based on the type of rental item, the type of customer, the day of the week, etc. This 'Alternate Due Time" is available in the "Enter/Modify Lookup Tables" section, under "Rental Item Pricing" part.5.2.10 Minutes Of Grace Period BizPie provides a method of allowing your customers to return rental items that are late within a reasonable amount of time (example:15 minutes) and not have to be charged a late fee automatically. The system will automatically add a late charge to returned tapes only if it exceeds the return due time plus the grace period time. The rental item return due time is printed on the receipt only if your store was setup on a 24Hr. rental basis (example: rent at 1:OOPM, must be returned before 1:OOPM the next day). In this case the "Grace Period' will not be included in the printed due time on the receipt.
5.2.9 Require Employee ID at POS? If you want to record the Employee ID with every transaction, you can force the employee to enter their ID before allowing the transaction to start. This feature will work in conjunction with the "Passwords & Access Levels" section of BizPie at the POS screen. If there is a Password required for the employee to operate the POS transaction, it will be asked for before the transaction can be started. WARNING: You MUST enter an employee ID with a password in the "Passwords & Access Levels" section of BizPie You may operate the POS section without any passwords by leaving them blank in the "Passwords & Access Levels" section of BizPie, but still require an employee ID for each transaction.
5.2.10 Clear Employee ID after each transaction? The Employee ID may be cleared after each transaction. This will also clear the Employee Password. To start a new transaction, the employee must enter their ID and password. To make it easy and quick for employees to enter their ID and password you can print barcode labels for them in the "Barcode Printing" section. They scan these barcodes for ID and password, thus reducing the typing required. This method allows each employee to operate any station in a multistation setup, and still track the employee's activity using the "End of Day Report" by "Employee ID".
5.2.11 Startup BizPie at POS Screen This allows you to go directly to the POS screen when you start up BizPie, eliminating the need to select it from the main menu.
5.2.12 Allow "Enter" key as "Cash Received" key Disables the use of the "Enter" key as the "Cash Received" key. You must press one of the function keys to complete the transaction. These function keys record the method of payment for the transaction.
5.2.13 Allow Change or Deleting of Late Charges This option set to "N' will not allow anyone to change or delete a late fee on the PointOfSale screen. If you set this option to "Y", you will still have a measure of security by entering a password in the "Enter/Modafy Passwords and Access Levels" menu. Without the correct password, clerks will not be able to give free tapes to customers. If you set this option not to allow changes to late fees and still want to be able to have the ability to reduce late fees, you may use the "Store Coupon/Discount" feature in the POS section at the time of late return. By typing a 6 as a rental item,(instead of a rental tape ID) you will be allowed to enter a discount dollar figure directly on the screen. This will be a minus amount which will reduce the invoice total, thus in effect reducing the late fee the customer has to pay. The advantage of this method is all late fees will be recorded in the system. These late fees are accumulated in the customer's file, in the POS cash report and the store transaction log. Thus the store owner or the manager can prevent clerks from arbitrarily discounting late fees.
If you set this option to "N', free tapes will not be allowed to be given to a customer unless the customer is qualified to receive one. If you set this option to "Y", you can still limit giving free tapes to customers by using the "Enter/Modify Password & Access Levels" menu. Without the correct password, clerks will not be able to give free tapes to customers.
5.2.15 Print Customer address on Receipt If you want to have the customer address print on the receipt, enter "Y".
5.2.16 Print Used PrePaids and Free on Receipt If you want to print the free tape count or prepaid count remaining on the customers account on the receipt, enter "Y" for each.
5.2.17 Always Display Customer Picture If you do record customer's picture with a scanner, you can force it to be displayed whenever the customer's account is placed on the POS screen. Pressing Enter will clear the picture and continue with the transaction.
5.2.18 Record VOID transactions If a POS transaction is voided you can record this fact in the transaction detail file. This transaction file can be printed at the end of day to detect if any transaction have been voided.
5.2.19 Record NoSale transactions If a POS transaction is completed without any customers or items, you can record this fact in the transaction detail file. This transaction file can be printed at the end of day to detect if a NoSale transaction have been done.
If you do not collect customer activity log information, you can speed up the POS transaction by telling BizPie not to search for tapes in the history file. If you don't use reservations in BizPie, you can speed up the transactions also by telling it not to search for reservations.
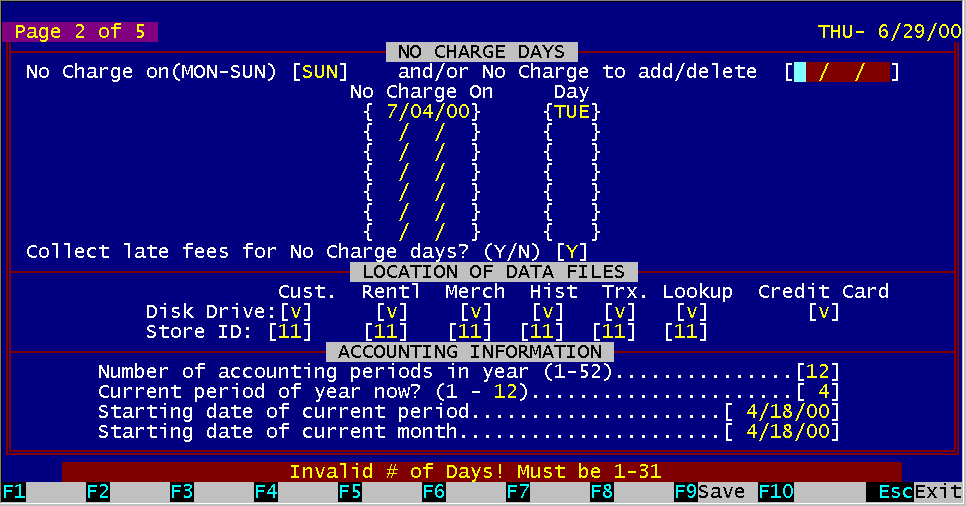
Figure 5.2 Store Screen Page 2 of 5
There are several holidays throughout the year where the store may be closed, or you do not wish to charge rental fees or late charges. You may enter a day of the week that you don't want to charge rental fees or late charges, and the calendar dates will be calculated automatically. You can also add individual dates that you are closed, by typing in the actual calendar date. This must fall in between the two dates displayed on the screen if there are dates already displayed. BizPie automatically recalculates all late charges and rental due dates without having to reprice every rental item in the Lookup Tables. NOTE: You must enter these dates as far in advance of needing them as possible! BizPie records the due date when tapes are rented, not when they are returned.
5.3.2 Disk Drives Allocation For Files Enter the disk drives to use for BizPie data files This field is used if you have to split the data files across two hard disks to allow files larger than a single hard disk can contain.
Enter the designated store ID to use for BizPie.
5.3.4 Number of Accounting Periods Enter the number of accounting periods in an accounting year. Some accountants use a 13 period year (4 weeks per period), some like to use a 52 period year, but most use the standard 12 period year. This number is used for "End of Period' processing, depreciation processing and other accounting functions.
5.3.5 Current Period of the Year Now Enter the number of the current period you are in now: Example #1: Current month is February and you are using an accounting period of 12 per year, therefore you are in the 2nd period. Example #2: You are in the 11th week of the fiscal year and you are using an accounting period of 13 per year, (52 weeks divided by 4 weeks = 13 accounting periods) therefore you are in the 3rd period.
5.3.6 Starting Date of Current Period Enter the beginning date of the current period. Typically, this date is the first of the month in a 12 period year.
5.3.7 Starting Date of Current Month Enter the beginning date of the current month. If the starting date of the current month is the same as the starting date of the current period, a 12 period calendar year is assumed.
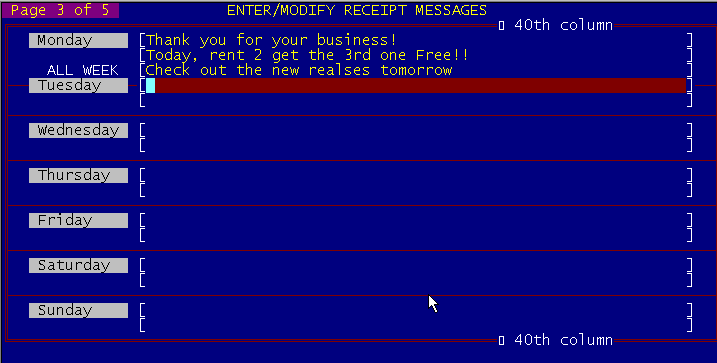
Figure 5.3 Store Screen Page 3 of 5
You have the ability to enter two lines of promotional messages that are different for every day of the week. If you leave any day's message blank, BizPie will print "Monday's" message for that day of the week. Thus you only have to enter a message in "Monday" for it to print the same one every day of the week. This message will be automatically centered on the invoice. If you are using a 40 column printer you can have a message only 40 columns long, thus "Column 40" is marked on the screen.
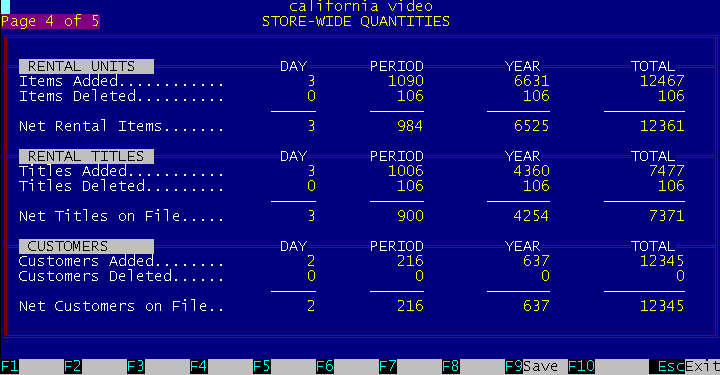
Figure 5.4 Store Screen Page 4 of 5
5.5.1 Storewide Rentals and Sales This screen provides details of the system quantity counts, items added, deleted, customers added, deleted. This screen can be password protected so only authorized people can look at these figures.
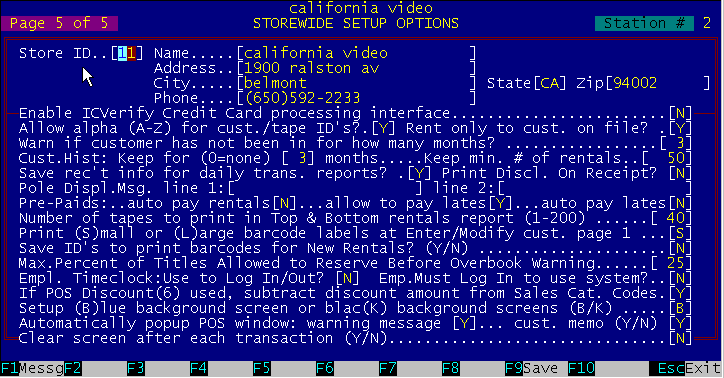
Figure 5.5 Store Screen Page 5 of 5
The "store ID" is the store ID pre-assigned by BizPie computer center. This unique number is to identify the participating store.
5.6.2 Enable ICVerify Credit Card Processing Interface You enable ICVerfy Credit Card Processing option on here.
5.6.3 Allow Alphanuinerics In ID Codes Select the optional ability of BizPie to use only numbers or use both numbers and letters for tape and customer ID's. Careful consideration should be given to this setup choice. Even though BizPie can handle any combination of ID's, we recommend using the "numbers only" scheme. If you already have a system, you should retain it. If you haven't got a system, now is the time to organize your inventory and create one. For ease of use we suggest a numbering system that has a fixed length number for all your rental items. If you have multiple locations, you may want to assign a store ID as a prefix or a suffix to each rental ID. This will aid you to immediately recognize each rental item's original store location as you transfer tapes between stores. BizPie has a "Import/Export Rental Item" section which allows you to easily transfer tapes between stores without having to reenter any data at the destination location.
5.6.4 Rent Only to Customers on File? This field allows you to rent only to customers who's names are on file in the system, if they have their names placed into "Enter/Modify Customers" section of BizPie. If you answer "Y", you will not be able to have "John/Jane Doe' customers rent items.
5.6.5 Customer warning if not in? Enter the number of months that passed since the last time the customer was in. The POS screen warns you is the customer has not been in for this number of months.
5.6.6 Customer History to Retain by months Enter the number of months you want to retain customer history. This is a list of every transaction line item for each customer. This information is displayed in the "Enter/Modify Rental items", screen page 4 of 4 and in "Enter/Modify Customers"; screen page 4 of 5. You can limit the amount of customer names retained by the rental history file. Doing so will reduce the space required by the disk to store the rental log data. The customer and tape rental history data will accumulate continuously every. day. BizPie does not automatically remove history records older than the specified number of months. It will remove history records older than the specified date only by selecting the "Purge History" question in the "EndOfMonth Processing section in "Management Menu". This section scans the customer and rental item files and compares the months of history retention requested with the date of the individual history record. Any rental history older than the specified number of months will be deleted. A second function of this history data is to alert the operator at the POS screen if a customer is renting a tape that was previously rented by them. A message appears on the bottom line of the POS screen which displays the name of the tape and the date it was last rented. The obvious requirement is that the rental item be still in the rental log files. Therefore, if you purge the history files after three months, and the customer is renting a tape they have seen four months ago, there is no way to alert the customer since the history data has been deleted during the purge process. The history must be purged periodically to prevent a large accumulation of data. The number of month to retain this information is looked at when you perform the "End of Period" processing in the "Management Menu".
5.6.7 Minimum Customer History Record to Retain Enter the minimum number of records you want to retain for each customer in the history file.
5.6.8 Collect Transaction Information The transaction collection option records every line item on the POS screen in the transaction file. It is basically a duplicate of the transaction. If you select to collect this data, the transaction line item details will be recorded whether a receipt is printed or not. Whether a receipt is printed or not, a transaction number will be assigned to every transaction by BizPie. This transaction number is independent of the receipt number, since a receipt may not be printed for all transactions, such as a rental return without a late charge. This transaction number (and receipt number, if one is printed) will be recorded in the transaction file, and will be purged whenever the transaction report is printed and you elect to purge the transaction file after printing it. The main purpose of it is to allow an reconciliation and accounting of the day's activities. If you have a multistation system, this report will summarize the activity of all the stations. It will also provide information used by the system to print the daily employee activity report. In a single station system you may find this information to be redundant to the POS Status Report generated by the AltF9 function while in the POS screen. To reduce the amount of time it takes to ring out the cash drawer every night, you may tell the system not to collect this information. BizPie assigns a transaction number to every transaction, in addition to a receipt number whether a receipt is printed or not (if you elect not to print receipts for certain transactions). If you elect to use this option, you must periodically print the transactions recorded in the transaction file. After the transactions are printed, all records of the transaction summary data will be purged. Therefore if you decide to collect this data and not print it, it will keep accumulating and taking up disk space.
If you have a prepaid customer renting at the POS screen, this option will automatically allocate a prepaid rental unit from the customer's account. This will force the customer to use up the prepaids for every rental. If you say "N" for this option, the clerk has to indicate on the POS screen which tapes are to be used for prepaid rental by pressing the F6 function key.
5.6.10 Allow PrePaid to pay for Late Fees If as customer has prepaid units in their account, do you permit them to use up a prepaid unit to pay for late fees. If you say "Y", each time you press F6 function key, a. prepaid count will be deducted from the account and on day's worth of late fees will be deducted from the late tape.
5.6.11 Number of Top & Bottom Tapes to Print BizPie allows you to select the number of rental tapes you want to see on the report when you print the top and bottom rental report list. This number may be changed any time.
5.6.12 Print Small or Large Barcodes for Customer When you print a customer ID barcode label, do you want it to print on a small labels or the large label. This label can be printed from either the barcode printing section of BizPie or by pressing Fl Function Key on Screen 1 of 5 in the "Enter/Modi fy Customer" section.
5.6.13 Save ID's to print new barcodes When you add new rental items and want to print barcode labels just for newly entered items, BizPie will save this fact. When these barcode labels are printed, they will not be printed the second time automatically. @PARAGRAPH = Maximum Reservations Percentage. Select the maximum percentage you permit each rental item to be reserved.
You can choose the background screen color to be either black or blue by selecting the appropriate letter.
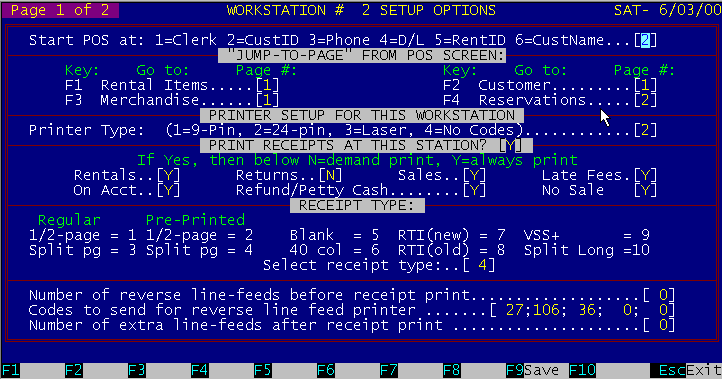
5.7 Station Screen Page 1 of 2
Figure 5.6 Station Screen Page 1 of 2
This screen is used to setup each individual station in a single station or muftistation system. The Station number is displayed on the top right corner of the screen to show which station you are working with. Since each station can be defined individually, you may assign specific functions to them. As an example, even though BizPie can perform any function on any station, you may assign one station of three stations to be used just for rental returns. You can do this by selecting the receipt print options to print receipts only if the rental return has a late charge.
5.7.2 Starting Position on POS Screen You can select where you start the transaction on the POS screen. If you want the clerk to always make sure their ID is on the screen, start the transaction on the "Clerk ID". If you select "Require Clerk ID at POS" to be "Y", BizPie will always start on the "Clerk ID" field.
BizPie has the ability to go directly to other sections of the system from the POS screen without first having to go to the Main Menu. There are multiple screens available to view when you "Jump" to them from POS. With this option you can tell BizPie which of these screen pages to display when you "Jump" to them by pressing the appropriate function keys at the POS screen. Enter the pages you wish BizPie to jump to from POS screen when accessing the rental, customer, merchandise and reservations sections directly.
You can select the printer type you have attached to this station. The only reason for this selection is to allow you to print barcode labels (except on laser printer). The 9 pin and the 24 pin printers have different codes to print barcodes. The laser printer capability is only for Rental Item reports, 4 and 3 across catalogs, not for barcode labels. You MUST set your laser printer to print 16.6 characters per inch using the built in internal font of the laser printer. Consult your laser printer manual for instructions.
5.7.5 Print Receipts at this Station? If you do not have a printer attached to the computer or to a workstation on a multistation system, answer "N'. This will prevent an attempt to print a receipt upon completion of a POS transaction. Station Screen Page I of 2 Enter/Modify Store Information If you do have a printer attached to the computer or workstation and want to print receipts for the options selected under "Print Receipts For" below, answer "YES" .
5.7.6 Demand Receipt Print Option If you have a printer attached and want to print receipts ONLY for certain customers, you must answer "NO" to all the "Print Receipts For" options below. If at the completion of a POS transaction you want to print a receipt for a customer, proceed as follows: Instead of pressing F2, F3, F4 or F5, you should first press the 'Alt" key and hold it down while you press the F2, F3, F4 or F5 function keys. This procedure will not only complete the transaction, but will print a customer receipt as well, for this transaction only.
These fields allow you to select the type of transactions to print receipts for. If you select any of these by entering [YJ, a receipt will be printed. If you select [NJ for any of these choices, a receipt will not print if the choice you have selected is the only item on the receipt. By selecting [NJ to all of the seven fields, you will not print any invoices for any transactions, except as noted above for "Demand Receipt Print Option" printing.
You can select any of the six types of receipts forms to print on, Receipt types # and #2 are 9 1/2" x 5 1/2" two part carbonless. Receipt types #3 and #4 are 9 1/2" x 6" single sheet, and is split in half down the middle vertically. Type # 1 and #3 has the computer print your store's name on the receipt, and type #2 and #4 assumes that you have your name pre printed on it. Receipt types #5 is printed on blank white paper 9 1/2" x 5 1/2", The computer will print all information on the blank paper, including the form lines and your company name. Receipt type #6 uses a 40 column roll paper. This type of receipt is similar to the ones used in supermarkets. All the information is still on the receipt, except it's only 40 columns wide. When the receipt is printed, you just it tear off as in an adding machine. This receipt type still has provisions for the customers' signature.
5.7.9 Receipt Reverse & Forward Feed To permit a wide variety of printers to print receipts and barcode labels, you can setup the number of line feeds to use to move the receipts or the barcode labels before and after printing. To setup your printer properly, you should align the tear bar at the perforation of the receipt you are using. Turn off the printer and then turn it back on to set the top of form on the printer. Then print a receipt to see where the receipt text prints. If it starts printing below where it should, you should set "Number of reverse line feeds before receipt printing" to a number of lines required to start printing correctly. Every time you adjust this number, you must realign the receipt perforations at the tear bar and reset the printer by turning it off and on. Once the receipt is printing in the correct position on the paper, you can setup "Number of Extra Line Feeds After Receipt Print" number if needed. The receipt should end up with the perforation at the tear bar, so you can tear off the receipt, and have it be ready for the next one.
You must enter the "Reverse Linefeed Codes" for the printer if you are to have the receipt reverse linefeed before printing. These codes are found in your printer's manual. The standard codes supplied are for an IBM/Epson compatible printer. |
|||||||||||||||||||||||||
|
|||||||||||||||||||||||||
|
|
|||||||||||||||||||||||||
|
|||||||||||||||||||||||||
| [BizPie] [About Us] [Sales Information] [Service] [What's New] [SiteMap] | |||||||||||||||||||||||||
Please contact our Webmaster with questions or comments. |
|||||||||||||||||||||||||