|
|
|||||||||||||||||||||||||
This chapter will show you how to enter new rental items into the rental inventory, and how to change information about a rental item. Rental items may be video tapes, laser discs, VCR's, TV's, camcorders, etc. The rental items you enter into the rental inventory in this section may also be sold if you so designate them, on the first page of the "Enter/Modify Rental Item" screen. Items which will never be rentable, such as magazines, blank video tapes, candy, etc., should be placed into the merchandise inventory. When first entering this section from the "Main Menu", the computer will display the "Enter/Modify Rental Items" screen. There are many detailed pieces of information that can be stored about a rental item. Since the majority of the rental items will be rental tapes, most of the information needed on the screens are related to movies. There are six screens, or pages, of information about each rental item. The current page number being worked with is displayed on the top left side of the screen (Example: "Page 1 of 6"). The only items that are required to be entered are on the first page (1 of 6) and are marked by an asterisk (*) in front of the field. The other items on page one and the other pages of information need not be entered. These items may be added at a later time. This design was implemented so you can quickly enter the minimum amount of information required to start using the system. Rental items are handled differently in the BizPie system than merchandise items. A single record is kept for each and every item in the rental inventory. If the quantity is more than one for a given item, a new record must be created for each one. This method allows tracking of every individual item in the rental inventory.
7.1.2 Rental Item Identification There are 10 positions available for rental item identification. You may use any or all of these ten positions for your rental items. BizPie provides two types of industry standards for barcoding schemes. You must choose one of these two methods before starting to enter your rental inventory items. Each code has its advantages and disadvantages. The first is the "Universal Product Code" (UPC) which is a numbers only code, and the second is "Code 3 of 9" which allow you to mix numbers, letters, and some special characters in the identification. UPC barcodes are used throughout the retail industry. Almost all retail merchandise have UPC barcodes printed on them by the manufacturer of the product. BizPie can only use these preprinted barcodes in the merchandise section of the system. Even though you may choose "Code 3 of 9" barcodes for your rental items, you may still use UPC codes in the merchandise inventory. These preprinted UPC barcodes have only one number assigned to them by the manufacturer of the product for each type of an item. As an example, a blank video cassette has a number on the back of it which indicates the manufacturers part number. BizPie requires every rental item to have a unique identifying number for tracking purposes, thus this preprinted number is not suitable to be used as the rental item identification number. To use the UPC barcode scheme, you must assign your existing or a new number to rental items. The preferred numbering scheme is the Code 3 of 9 barcode system. This barcode is shorter than UPC for the same amount of numbers. This makes it easier to read, and the labels are also smaller so it can be attached to smaller items. "Code 3 of 9" barcodes provide you with the capability of having both numbers and letters (with some special characters) as part of the rental item numbering scheme. The main advantage of this barcode system is if you already have your rental items with alphanumeric identification labels on them, you may continue using it as before. This type of code has a much wider printed barcode label for the same amount of numbers than UPC. It does, however, give you the ability to embed some meaning to the code. For example, you could have the tape category CO for Comedy or DR for Drama as part of the tape ID. If you have multiple store location, you may want to designate store A, B, C, etc. as part of the tape ID, in case you rotate your tapes between stores. In summary, we recommend using the Code 3 of 9 barcodes.
BizPie has a feature that you can use previously entered information about an item as a model for new items to be entered, without having to repetitiously reenter every bit of information for every rental item. The system does not automatically clear the screen for a new item (there is a special key for that). Thus all information that's the same about an item may be left unchanged. The only data that have to be changed are the ones that are different from the displayed data. This method of data entry provides the quickest way possible of building the initial rental inventory. There are five "pages" of information about every rental item. The page numbers are displayed on the top left part of every screen. To display any of the other pages, press the "Pg Up" or "Pg Dn" keys on the numeric keypad. To move forward to the next page press the "Pg Dn" key, to move backward to the previous page, press the "Pg Up" key. These five pages contain all the information about each rental item in the system. You must be careful when entering information on pages two and three. These pages will also be modeled from the previously saved rental item. As an example, a previously entered movie has, as the first star, Paul Newman (displayed on screen page 2 of 6), and the new movie has the first star as Jerry Lewis. If you don't go to the second page (page 2 of 6) to change the name of the star to Jerry Lewis, the previous star (Paul Newman) will be recorded as the star for this newly entered movie. If you don't want to use the "MODELING" feature when you are entering new data for a new rental item, you should press the "F7" function key. This will clear all the data on the screen from the previous rental item, including the data on screens two and three.
Figure 7.1 Screen Page 1 of 6
The first page contains all the required information to start using the system. You do not have to enter information into all of the fields on the first page. The only fields that are required to be filled in are designated by an asterisk (*). These are the only fields which must be completed to start using the system. The rest of the information on the first, second, third and fourth pages can be filled in at a later time. When you are finished entering all the information into the fields you want to fill in on page one of four, you may continue on the second page of the rental item. To display the next screen, press "PgUp" for the previous screen, or "PgDn" for the next screen, on the numeric keypad (With "Num. Lock" off).
This is a required field. This field is the individual number, letter, or combination of numbers and letters you assign to a rental item. There are a total of 11 positions that may be used for rental item ID. You may choose to use only numbers, car a combination of numbers and letters for the rental item ID's . If you choose to use numbers only, BizPie will use and print labels for the industry standard UPC (Universal Product Code) barcode for your rental inventory. If you choose to use both numbers and letters in your rental item ID's, BizPie will use and print "Code 3 of 9" alphanumeric barcode labels for your rental items. This type of barcodes also allow certain special characters as follows: If you already have a system for your rental ID's that includes letters, then you should continue to use them as before so you will not have to relabel all your tapes. This number can be your existing number for a particular rental item, or it can be a newly assigned number. BizPie instantly checks the inventory to make sure there isn't another item already in it with the same number you just entered. If there is already a rental item with the same number you just entered, it will be displayed on the screen. This method of verifying for duplicate numbers gives you an instant check to see if an item is already in the inventory or not. If there is no other item in the inventory with the same number, a beep will sound and a "New Record" message will appear in the top left corner of the screen alerting you that you are about to create a new item. If you entered an item number and only wanted to find an existing item which you know to be there, you probably entered the wrong rental item number if the "New Record' message appears. In addition to your normal number, you may assign a sequence number to track multiple copies of the same title. As an example if "Star Wars" has a tape ID number of 1234, and a sequence number of 01, making the complete number 123401. Thus the second "Star Wars" tape will have the number 123402, the third will have the number 123403, etc. This way you can have up to 99 copies of the same title, and still retain the significant numbers that are the same. If there is only one copy of a title, you should still use the sequence number of 01, in case you want to add a second copy. Once you enter the rental ID and have save it in the system, you may change it only by the use of a special key. The first step is to display the rental item to be changed. Then press function key "F6". This will signal the system that you want to change the rental ID, and a message on the top left side of the screen will indicate "Change Key". Now you may make the change to the rental ID, and when you are done, press "F9" key to save it. Instead of immediately saving the changes, BizPie now warns you that this may take several minutes to save. If you are sure that you want to make the change, answer "Y". The system will search all files where this rental ID is used and make all the necessary changes. If the item is out on rental, you will not be able to change the rental ID until it's returned.
7.2.2 Alternate Rental Item ID This field is identical to the main rental item ID, except it's used in case the barcode label is damaged and you can't read the main rental item ID. At the POS screen, pressing the * key on the "Numeric Keypad" only (grey key) will popup a window for you to enter the "Alternate Tape ID".
This is a required field. The system will automatically mark a new item as "IN' "Status" field simply designates the present status of a rental item.
This is a required field. This field is used for the main name of the movie, if the item is a rental tape, or the name of the product if the item is rental merchandise. Find out the way the title is named from the catalog site (zip code = 00000) in the caVideo (see a Video) website, www.cavideo.com . Create the title exactly the same way as shown in the website. For any movies not in the website, you are free to name it according to your convention. Notify the BizPie.com technician of the title.You can make any change in the spelling of the name as you need to until you actually save this new item by pressing function key F9. Once you enter the "Main Title" and have save it in the system, you may change it only by the use of a special key. The first step is to display the "Main Title" to be changed. Then press the function key " F6 ".This will signal the system that you want to change the tape title, and a message on the top left side of the screen will indicate "Change Key". Now you may make the change to the "Main Title" and when you are done, press "F9" key to save it. Instead of immediately saving the changes, BizPie now warns you that this may take several minutes to save. If you are sure that you want to make the change, answer "Y". The system will search all files where this "Main Title" is used and make all the necessary changes. If the item is out on rental, you will not be able to change the "Main Title" until it's returned. When you want to search for a "Main Title" of a rental item and don't remember the complete spelling of the movie name, you may enter as few of the letters of the name as you are able to. BizPie will search for the first "Main Title" that has the closest match to these letters and displays it on the screen. Then, if the title is not the one you are looking for, you may search for the "Next or "Previous" title by pressing function keys "F8" or "F4", respectively.
This is a nonrequired field. The SubTitle is used to indicate the second name of a series of movies. The "Star Wars" series mentioned above would have the subtitles as "The Movie"; "Return of the Jedi"; etc. The "Star Trek" movie series could have subtitles such as "The Search For Spock", etc. If you don't remember the complete name of the "SubTitle", you may enter as few letters of the name as you able to. BizPie will search for the first "SubTitle" in inventory that matches these letters and displays the item on the screen. You can make any change in the spelling of the name as you need to until you actually save this new item by pressing function key F9. Once you enter the "SubTitle" and have save it in the system, you may change it only by the use of a special key. The first step is to display the "SubTitle" to be changed, Then press the function key "F6". This will signal the system that you want to change the rental ID, and a message on the top left side of the screen will indicate "Change Key". Now you may make the change to the "SubTitle" and when you are done, press "F9" key to save it. Instead of immediately saving the changes, BizPie now warns you that this may take several minutes to save. If you are sure that you want to make the change, answer "Y". The system will search all files where this "SubTitle" is used and make all the necessary changes. If the item is out on rental, you will not be able to change the "Sub Title" until it's returned. When you want to search for a "SubTitle" of a rental item and don't remember the complete spelling of the movie name, you may enter as few of the letters of the name as you are able to. BizPie will search for the first "SubTitle" that has the closest match to these letters and displays it on the screen. Then, if the title is not the one you are looking for, you may search for the "Next or "Previous" title by pressing function keys "F8" or "F4", respectively.
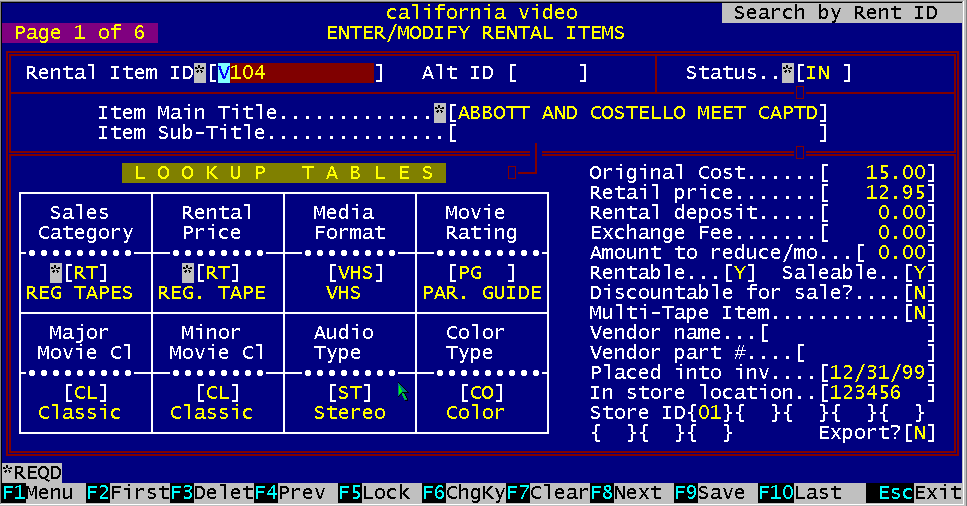
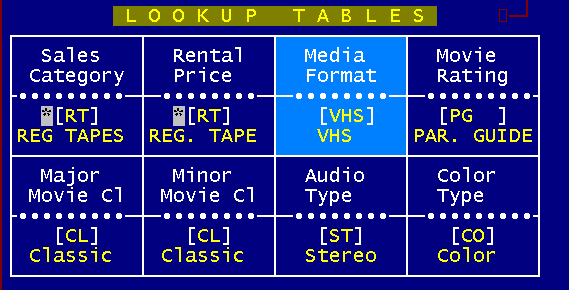
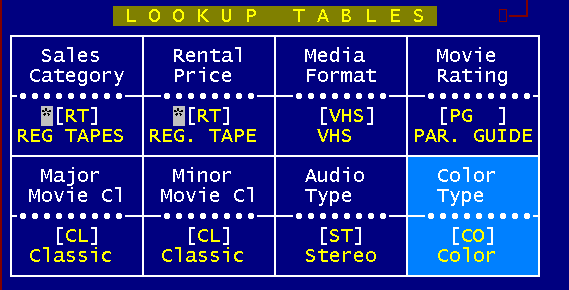
Figure 7.2 Enter Data Lookup Tables
There is a special way of entering data into the next eight fields using the lookup tables. Rather than entering data in freeform, you must use a predetermined selection of correct answers as to how each rental item will be treated by BizPie. You must first use the "Enter/Modify Lookup Tables" (Chapter 6) section of BizPie, to predefine the correct answers that the system will accept as information about each rental item in this section. This method of precoding key facts about each rental item allows you to quickly and accurately categorize them. It also allows clerks to be able to enter new rental items into the rental inventory, and still keep critical information accurate. In order to use the next eight data entry fields, you must completely setup the "Lookup Tables" as you would want the rental items to be coded. You may use the four arrow keys or the Enter key to position the cursor to the field you want to change. When you are in the field you want to change, you can either type in the correct lookup table code, or you can use the F4 or F8 function keys to scroll through and display the available options. NOTE: There first two fields of the following eight are the only required fields. These entries may be changed any time.
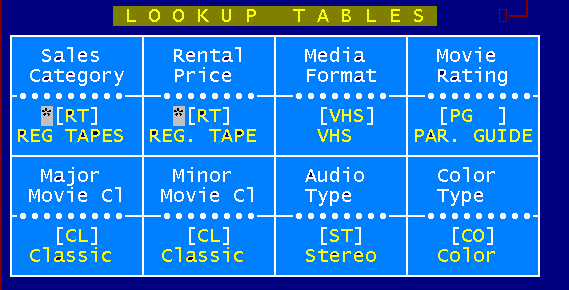
Figure 7.3 Lookup Tables Sales Category
This is a required field. It is the sales category code assigned for this item. This code was setup in the "Enter/Modify LookupTables" section. This code will be used to accumulate financial information about the rental item by sales classification. Sales category is used in the following reports: Daily POS Status, Daily Storewide Report and Monthly Storewide Report. A sales category activity report is printed whenever the cash drawer is closed out for the shift (AltF9 at the POS screen). This report prints the daily totals by item count and dollar amount for each sales class, for rentals and sales, according to the sales category you have setup here for each item. The more sales category codes you assign to your rental and merchandise inventory items, the more detailed breakdown of the sales activity you will be able to have.
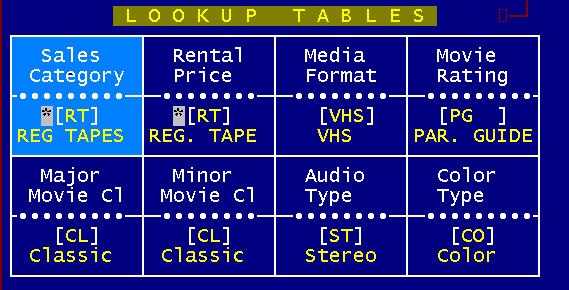
Figure 7.4 Lookup Tables Rental Item Prices
This is a required field. It is used to select the rental price code for this item. The rental price codes must be setup in the "Rental Price" section of the "Enter/Modify Lookup Tables" part of BizPie before they can be used here. This field will determine which price table will be used when this item is rented, based on the rental item type, the customer type and the day of the week. The "Weekly Discount Schedule"; if setup in the "Management Menu" will override this "Rental Price" code, for the days of the week it's in effect.
Figure 7.5 Lookup Tables Media Formats
This is a nonrequired field. The format of the movie (for this copy only) is recorded here. It is used in the reporting and selection section of the BizPie. With this field you can provide a listing of titles in the specified format to your customers. The recording format codes must be setup in the "Recording Format" section of the "Enter/Modify Lookup Tables" part of BizPie before they can be used here (the more common formats are already setup for your use).
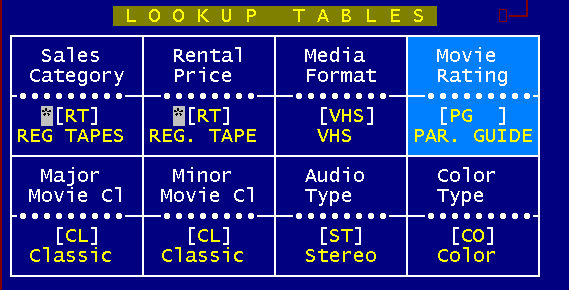
Figure 7.6 Lookup Tables Movie Rating
This is a non-required field. It is the MPAA assigned rating for this movie, and used in the reporting and selection section of the system. The movie rating codes must be setup in the "Movie Rating" section of the "Enter/Modafy Lookup Table" part of BizPie before they can be used here (the more common ratings are already setup for your use). You can also create your own movie rating, to suit your customer's needs. In certain states it's against the law to rent "slasher" type movies to kids under 17, even though the movie is rated PG13. With this lookup table, you can create and assign a rating such as "PGVI" code to a "slasher" tape. You can also use the "Rating Restriction Level" assigned to this rating to prevent unauthorized kids from renting this tape.
Figure 7.7 Lookup Tables Major Movie Category
This field is used to best describe the type of movie, sometimes assigned by the studio that produced it. An example would be "Musical'; "Drama"; "Western"; etc. The "Major Movie Category" is also used for report printing by "CATEGORY", in the "Enter/Modify Rental Items Report" section of BizPie. If you don't enter this code, the rental items will not be able to be sorted by this category for your reports. When large barcode labels are printed and there isn't any movie category for the rental item, the next available category will print on the label. The "Major Movie Category" is also used in the reports section to select and print a catalog list by movie category. You can search for rental items of the category displayed in this window by pressing F4 or F8 keys when the cursor is placed in this field. One example is to search for all children movies by typing in "CH" and then pressing the F8 key. This will display all "CH" tapes in the rental inventory.
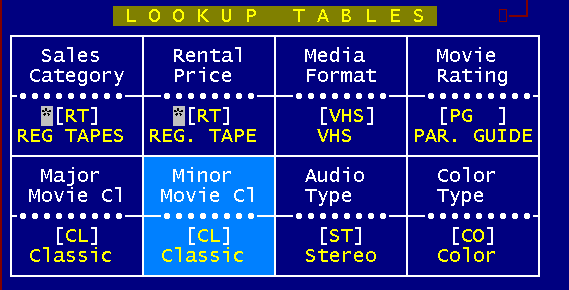
Figure 7.8 Lookup Tables Minor Movie Category This is a non-required field. It's the second category that can further describe the movie. An example would be to describe the movie 'A Star is Born". The main category would be "Drama", and since this movie is a musical, it can be further classified as minor category "Musical". BizPie has the ability to have two classifications for each movie. This allows you to have listings for your customer based on either the "Major" or "Minor" categories
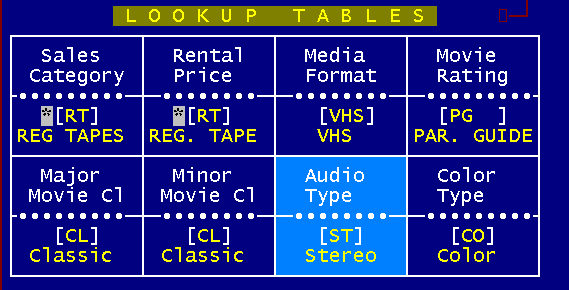
Figure 7.9 Lookup Tables Audio Type This is a nonrequired field It's used to indicate the type of sound track for the movie. It is mainly an information field, for reporting purposes.
Figure 7.10 Lookup Tables Color Type This is a non-required field. It's used to indicate the color of the movie. It is mainly an information field, for reporting purposes. End of Entering Data Using Lookup Tables This is the end of the "Lookup Table" data entry section of each rental item. The data entry fields that follow are the normal, freeform type.
Figure 7.11 Entering (Rental Item Data) This is the amount you paid for this item. This number also appears and is the same field as the one displayed on Page 3 of 6.
The Retail Price is used in the POS section when the customer buys a rental item. If "Retail Price" field is blank, the POS screen will automatically jump to the price field so you can manually enter a sale price. The Retail Price you enter here are printed on the large barcode labels for rental items.
This deposit is an override to the deposit entered in the Management Menu in Lookup Tables section, under Rental Price setup. If there is a dollar value entered here, it will override the dollar amount entered in the lookup tables. There are two other ways to have the system ask for a deposit when a customer rents an item. One is to assign the Customer Plan to be DR (Deposit Required) and the second is to assign the Customer Status to be DR (Deposit Required). This deposit will automatically be added to the transaction at the PointOfSales screen. If this field is left blank, and the Rental Price code assigned to this item has the deposit amount blank, there will be no deposit requested at the POS transaction section, even if the Customer Plan or Customer Status is required to leave a deposit.
There are two ways of returning this rental item if it was sold. The first method is a normal Refund, where the POS screen credits the customer the original amount of the purchase. The second is where the customer can Exchange the returned item for another purchased rental item. If the item is selected to be exchanged rather than the normal refund, you could charge the customer an exchange fee. If there is a dollar amount entered here, it is considered an Exchange Fee. A typical example for the use of the Exchange Fee is to trade in video games and charge the customer an exchange fee. If used, this will generate an additional line on the POS screen. This line is treated just like any other POS line item. The exchange fee can be setup to be taxable or nontaxable in the Management Menu under Store Information, Page 1 of 5.
This field is used in conjunction with the Retail Price field. It is designed to be used with an Exchange Plan where customers can purchase rental items, such as video games, and then return them to exchange it for another video game. You can setup BizPie to reduce the value of the purchased item by this fixed dollar amount every month. This reduction is calculated only when the purchased rental item is returned for an Exchange. The original Retail Price remains untouched. Example: Customer purchases a video game cartridge for $55.00 in January. He returns the game for an exchange of another cartridge in April. You have setup this field to reduce the exchange value by $5.00 per month. Since the customer had the game for three months, the original sale amount will now have a exchange value of $40.00 ($5.00 per month reduction). This new exchange value is the refund credit that's placed on the POS screen, not the original $55.00. Therefore, the customer now has only $40.00 to apply towards the purchase of the new video game. The Exchange Fee described above will also be applied, if there is an exchange fee amount in that field.
The "Rentable" field is used to designate whether or not if this item can be rented by entering a "Y" for yes and "N" for no. You might use this field if you have a newly released tape and you determined the tape cannot be rented, just sold.
This field is used to designate whether or not this item can be sold by entering a "Y" for yes and "N' for no. An example of a nonsaleable item is if a new tape had been released, and you want to just rent it only for the first few weeks. Another example is your rental VCR's.
This field is used to designate whether or not this item is discountable when you sell it. This discount is the percentage setup for the particular customer type as setup in the Lookup Tables, in the Customer Plan.
This field is used to designate whether or not this item has more than one cassette for the complete movie. If you mark it "Y", the POS section will warn the operator that there should be more than one tape for this title.
It's used to store the vendor (distributor) name of the rental item.
It's the part number your vendor assigned this item for reordering purposes (not your rental item number).
It is used to record the date this item was placed into the rental inventory. Today's date is defaulted automatically, but can be changed to any other date.
You may use it to record where this tape is located in your store. This field may be used in the report section to list tapes by location in your store.
This field is used for owners who have multiple stores that require transfer of rental items between stores. The "Store Owning This Item" field records the first store that has this tape placed into its inventory for the first time. This number is never changed once its entered with the rental item. This number always stays with each rental item if the rental item is transferred to another store.
This field allows you to "MARK" an item to be exported (or imported) by using the "Import/Export Rental Item" section of BizPie
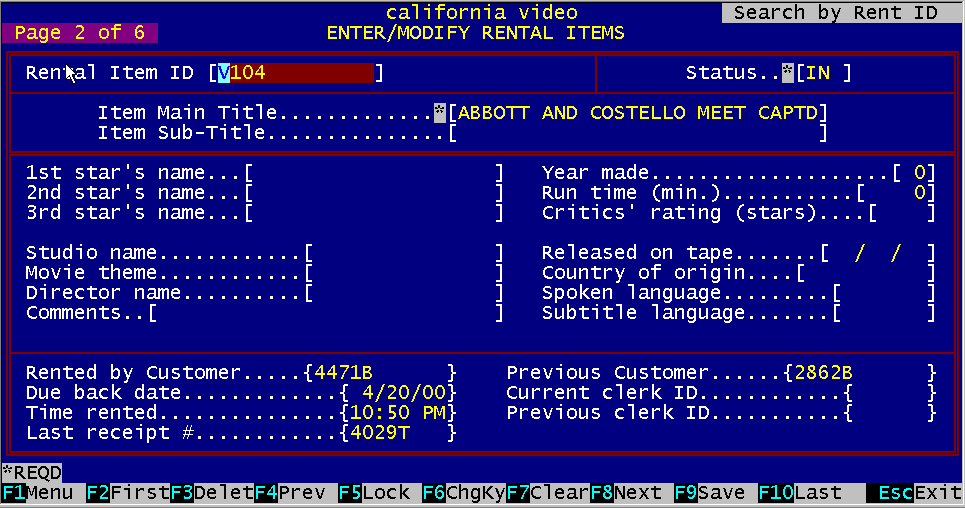
7.3.24 Store Last Exported From This field displays the last 8 stores, if any, that this rental item was exported from. If you have more than one location and you use the import/export feature of BizPie. Figure 7.12 Screen Page 2 of 6
The second page has additional detailed information about the rental item. None of these fields have to be filled in for the system to work correctly. These are information fields used during report selection and printing. Most of the fields are self explanatory. To display another screen, press "PgUp" or "PgDn" on the keyboard.
7.4.1 First, Second and Third Star's Name Name of the first, second and third star of the movie.
Name of the studio where movie was made. An example is "Disney Studios"; "MGM, etc.
The general theme of this movie. Example for "Star Wars" would be "SciFi adventure for family".
Name of the director for this movie.
The year this movie was made.
The length of this movie in minutes
The number of stars awarded by most critics for this movie.
The country where this movie was made.
The spoken language of the movie. This field is used mainly for foreign movies that are dubbed in a language other than the original.
The language of the subtitle if the movie has subtitles. This field is also used mainly to generate reports of foreign movies that have subtitles. This can be useful in an area where there is a large enough population to support the rentals of foreign movies.
Your general comments about this movie.
This field displays the current customer that has this tape out.
If the item is out on rental, the date it is due to be returned.
If the item is out on rental, the time it was rented.
Displays the last receipt number associated with this item. If the item was rented or returned without printing a receipt, the last transaction number is displayed. This number is not equivalent to the receipt number. The transaction number can be printed in the "Management Menu" "End of Day" reports.
Displays the customer ID whom previously rented this tape.
Displays the clerk whom last handled this rental item, If the Clerk ID displayed is "999999", the item was returned through the "Bulk Return" process.
7.4.18 1st & 2nd Previous Clerk ID Displays the last two clerks whom handled this rental item. If the Clerk ID displayed is "999999", the item was returned through the "Bulk Return" process.
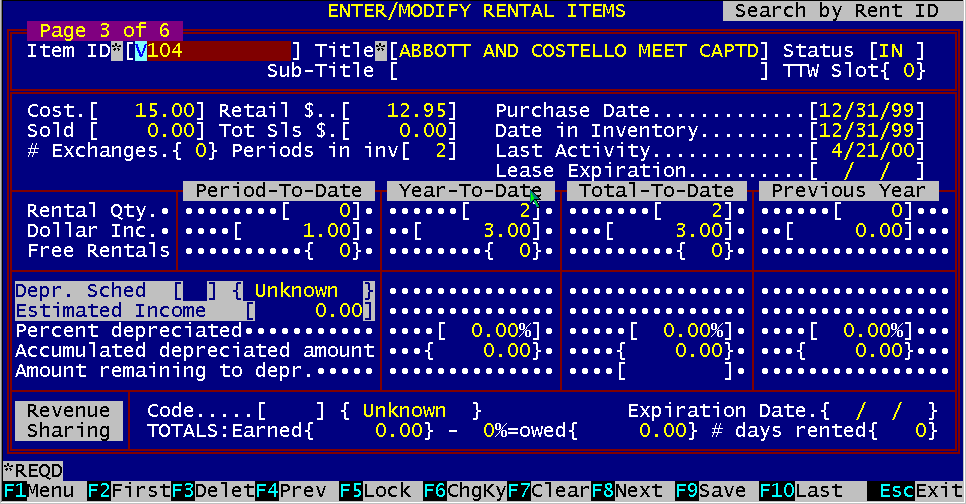
Figure 7.13 Screen Page 3 of 6
This screen provides additional financial details about a rental item. Some of the fields have data
generated by the BizPie and cannot be changed. This type of data is indicated by braces, { and }, enclosing the data, rather than square brackets, [ and ]. The
"Period To Date"; "Year To Date" and "Total To Date" rental quantity and dollars are enterable fields.
You can start with your existing data by entering your beginning amounts into these fields from records you now have.
The system will thereafter keep track of these amounts as they accumulate. If a field is updated, it will always add the new number to the period to date figures, the year to
date figures and historical figures at the same time. Therefore these numbers always represent the most current accumulation of numbers. If you run
"EndOfMonth Processing" , it will zero out the figures for the new month in the "Period to Date" accumulators. If you run the
"EndOfYear Processing" (see Management Menu), it will zero out the figures for month to date and year to date accumulators, roll over the year to date figures to previous
year and start a new year accumulation of information. The historical field will always contain the sum of all figures.
The price you paid for this tape when purchased. This field is the same one as the one on Page 1 of the rental item. This is an important number because it is used in the "Rental Item Performance" report. This number will determine how much return on investment this rental item is producing for you. It's also used to calculate the depreciation of the rental inven. tory.
This field is the duplicate of the one on Page 1. One of the places this number appears in print is on the large barcode labels for rental items. Its purpose is to print the manufacturers suggested retail price for the rental item on this label.
This is the actual price the item was sold for,
This is the total amount the item accumulated from sales. Since rental items have the potential of an Exchange plan, they can be repeatedly sold for different amounts. If the customer returns this rental item for an Exchange, the amount of the actual current exchanged value will be used to reduce the Total Sales Amount by. Example: If the item was sold for $55.00 and the exchanged credit value was $40.00, the net revenue generated by this item will be $15.00 ($40.00 refund credit given). If the rental item is sold again for $55.00, the new amount will be added to the Total Sales Amount, giving the total of $70.00. If the rental item is returned for a Refund, Total Sales Amount is reduced by the total of the refund amount.
Count of the number of exchanges for this item.
Enter the number of periods this item has been in your inventory as of today. This number is used to determine the rental item depreciation and valuation when printed on their respective reports. This number is incremented every time the End of Period and the End of Month processing is performed.
The date this item was purchased. As above, this date is used to calculate the return on investment this rental item is generating for you, based on how long this item has been in your inventory.
This date is used to track the actual date this item was placed on the shelves in the store. Your Rental Item Performance report uses this date to calculate revenue earned, rather than the date purchased (you may not have placed it on the shelf for rental the same day you received it.)
The date this tape was last rented, returned, exchanged or sold from inventory.
This date is used if you have rental items that are leased, rather than purchased. This date can be used in the reports section to extract financial data of the leased rental items.
The amount of rentals for this item this period.
The amount of rentals for this item this year.
Accumulated rental history for this item.
Accumulated rental history for this item for the previous year.
Amount of dollars generated by this item this period.
Amount of dollars generated by this item this year.
Accumulated dollar history for this item.
Accumulated dollar history for this item for the previous year.
7.5.19 Period To Date tunes rented free How many times was this tape rented free this month.
7.5.20 Year To Date Times Rented Free How many times was this tape rented free this year.
7.5.21 Total To Date Times Rented Free Total times this tape rented free.
This Lookup Table Code is used to assign a depreciation code to this individual rental item. If you decide to use the latest MACRS (Modified Accelerated Cost Recovery System) method of depreciating this rental item, BizPie will automatically track it and calculate the correct amount of depreciation every time you run end of period processing. Another way of depreciating the rental item is called Income Forecasting. This method is available ONLY to video tapes. You cannot use is on your rental equipment (see next field).
This field is used when you choose the "Income Forecasting" method of depreciating video tapes. You cannot use this method for rental equipment. Enter the amount of revenue you estimate this individual tape will generate for you during the life of the tape while its in your inventory. BizPie will use this number to calculate the each years depreciation based on your estimated income divided by your actual revenue. The ratio of this percentage is multiplied by you cost to derive at the annual depreciated value.
7.5.24 YTD Percent Depreciated Shows the year to date percentage already depreciated. This amount is calculated from the "Lookup TablesDepreciation" sec tion.
7.5.25 Total To Date Percent Depreciated Shows the total to date percentage depreciated.
7.5.26 Previous Year Percent Depreciated Display the previous years percentage depreciated
7.5.27 YTD Accumulated Depreciated Dollars Display the calculated, year to date accumulated depreciated dollars.
7.5.28 Total To Date Accumulated Depreciated Dollars Display the calculated, yeartodate total accumulated depreciated dollars.
7.5.29 Previous Year Accumulated Depreciated Dollars Display the previous years accumulated depreciated dollars.
7.5.30 Amount Remaining to Depreciate The remaining balance of the depreciated cost. This number is used to continue to depreciate the rental item until it reaches the percentage depreciation you setup in the Lookup Tables Depreciation section of BizPie.
If you are using the revenue sharing plan from a vendor for this rental item, you can enter the type of plan you have setup in the "Lookup Tables Revenue Sharing" section. BizPie will automatically track the revenue generated by this rental item. This information will be printed in the revenue sharing report.
Total revenue generated by this rental item.
Amount of money owed to the vendor by this rental item. This value is based on the revenue sharing percentage, added to the minimum vendor charge value as setup in the Lookup Tables Revenue Sharing section of BizPie.
This number displays the total days this item has been rented for.
This date is the limit that may be set by the vendor supplying the rental items.
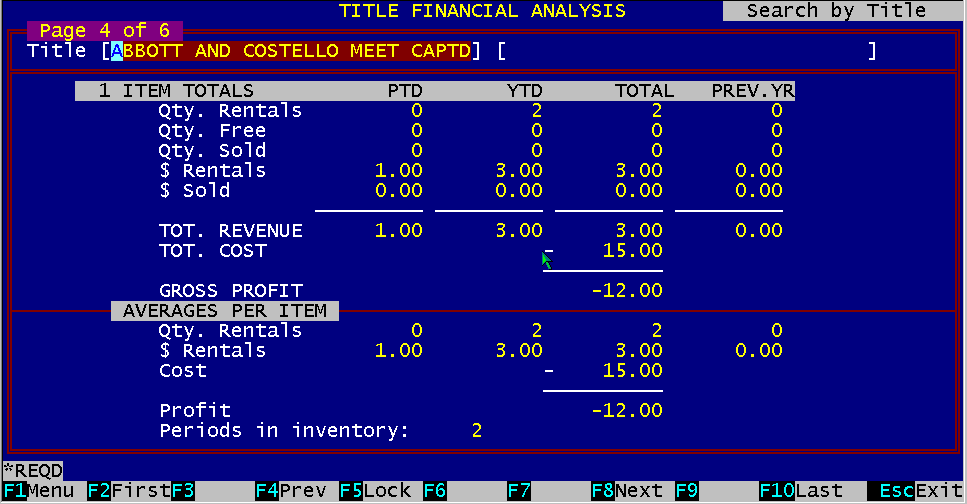
Figure 7.14 Screen Page 4 of 6 This screen provides a financial analysis of the sum of all copies of a single title. The top half shows the totals of the title and the bottom half shows the averages of the title.
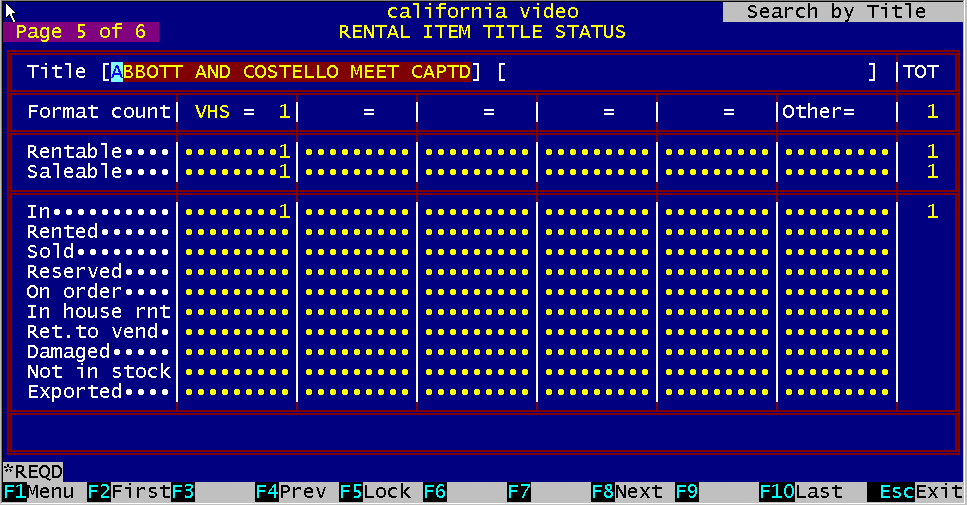
Figure 7.15 Screen Page 5 of 6
This screen provides a display of the status of all copies of a title. Six formats are displayed horizontally and their respective statuses.
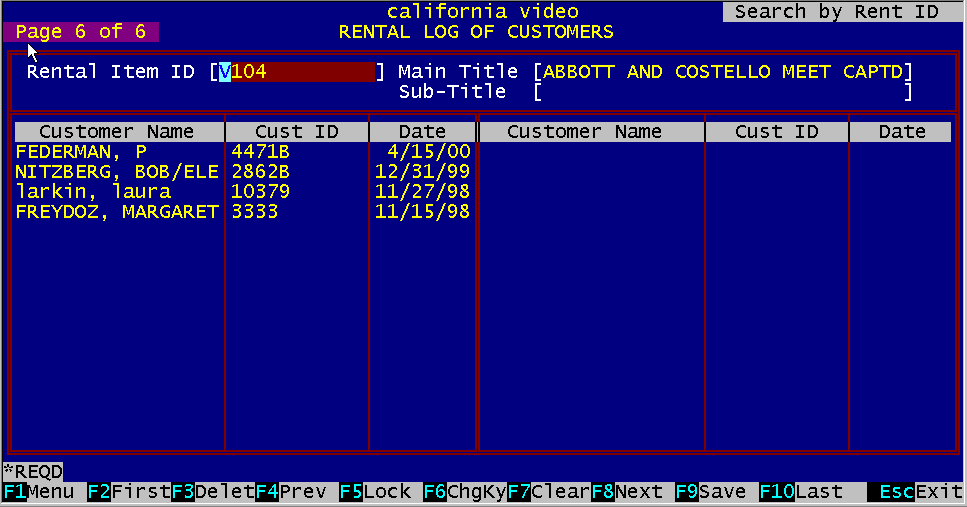
Figure 7.16 Screen Page 6 of 6
This screen provides a list of all customers, by date order, whom rented this tape. You can limit the amount of customer names retained by the rental log file if the "Enter/Modify Store Information" section. Doing so will reduce the space required by the disk to store the rental log data. Another function of this rental log data is to alert the operator at the POS screen if a customer is renting a tape that was previously rented by them. A message appears on the bottom line of the POS screen which displays the name of the tape and the date it was last rented. Even though you can display only the last thirty customers, you can print a list of all the customer that ever rented this tape by pressing "Function Key FT' If you purge the rental log files after three months, and the customer is renting a tape they have seen four months ago, there is no way to alert the customer since the rental log data has been deleted during the purge process. The purge process is accomplished during the "End of Month" processing in the "Management Menu" section. There, you will be asked how many months to retain the rental log data. The longer this data is kept, the more disk space it will use.
|
|||||||||||||||||||||||||
|
|||||||||||||||||||||||||
|
|
|||||||||||||||||||||||||
|
|||||||||||||||||||||||||
| [BizPie] [About Us] [Sales Information] [Service] [What's New] [SiteMap] | |||||||||||||||||||||||||
Please contact our Webmaster with questions or comments. |
|||||||||||||||||||||||||