|
|
|||||||||||||||||||||||||
BizPie can print either the retail industry standard Universal Product Code (UPC) labels or Code 3 of 9 labels on a standard "dot matrix" printer such as the Epson, Okidata, Citizen, etc. The type of barcode labels that will print is chosen in the "Management Menu" part, "Store Information" section of the system. The question is asked if you allow alpha-numerics in the customer or tape ID's. If you answered "Y", BizPie will print "Code 3 of 9" barcode labels. If you answered "No", "UPC' labels will be printed. These labels are placed on the rental items, retail merchandise items, customer membership cards and employee ID cards. The use of these barcode labels greatly enhances the accuracy of data entry at POS time. There is no need to type in the item ID for rentals, merchandise, customers or employees. Scanning the barcode label with the bar code reader wand will send the complete ID to the computer, just as if you had typed it in. This eliminates all data entry errors and reduces transaction time. The barcode labels for rental and merchandise items are printed on standard 3 1/2" by 115/16", one across paper labels available in most stationary stores. You may also print rental item labels on small labels, 23/4" by 7/16", which is the same size as the customer ID labels. These labels are designed to fit on the left or right edge of the video cassette. You can use these labels with transparent storage boxes that have a slot cutout on the sides of the container for barcode labels. The barcodes for customer IDs and employee IDs are printed on 2 3/4" by 7/16" labels. The customer ID labels are placed on either the membership card, or the customer's own credit card. The employee ID labels are placed on a store issued employee ID card. Using these barcode labels are as easy as scanning the label with the barcode reader. Instead of typing in an item ID, you just scan the label whenever the cursor is in the field where its expecting you to use the keyboard. Barcode labels for customers and tapes may be printed at two different times in BizPie: before or after rental ID's are assigned before or after customer ID's are assigned Rental Items and Sale Merchandise labels may be printed after they have been assigned and ID in the "Enter/Modify Rental Items" and "Enter/Modify Merchandise Items". Employee ID's can be printed only after they are assigned. The only exceptions are merchandise that may have barcodes assigned and printed on them by the manufacturer. Since Customer ID barcode labels may be printed in advance of using them, they will be available at the counter to be assigned to new customers.
Let's assume you have just entered ten new items into the merchandise inventory. To accomplish this, you've selected and used .the "Enter/Modify Merchandise Items" menu choice. You have five blank tapes with the UPC labels printed on them and five head cleaning cassettes without a UPC barcode label printed on it by the manufacturer. You can now print five barcode labels and place them on the head cleaning boxes. Now you may scan anyone of these labels with the barcode reader or you can enter these numbers into the "Merchandise Item ID" field on the screen using the keyboard to create and save a new merchandise item. Now when you sell these items in the POS section, they will be treated just as if the manufacturer had printed a barcode number on it.
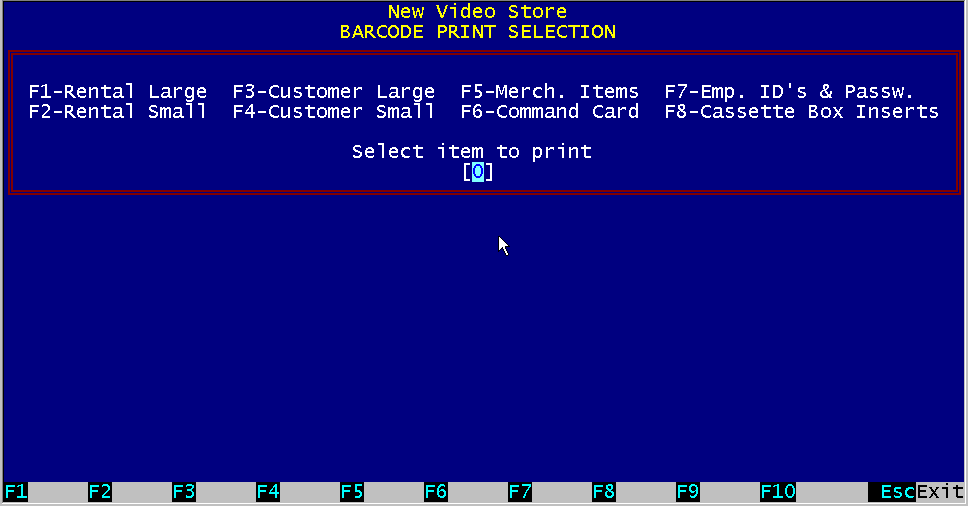
Figure 11.1 Barcode Print Menu
To start printing barcodes, select "Print Barcodes" section, "Management Menu #5". On the top half of the screen a "Mini Menu" will be displayed for the eight different options to print barcodes labels. The eight choices are: 1 Rental Items, large labels 2 Rental Items, small labels 3 Customer ID's 4 Customer ID's 5 Merchandise Items 6 Command Card 7 Employee ID's and Passwords Cassette Box Insert 8 Cassette Box Insert
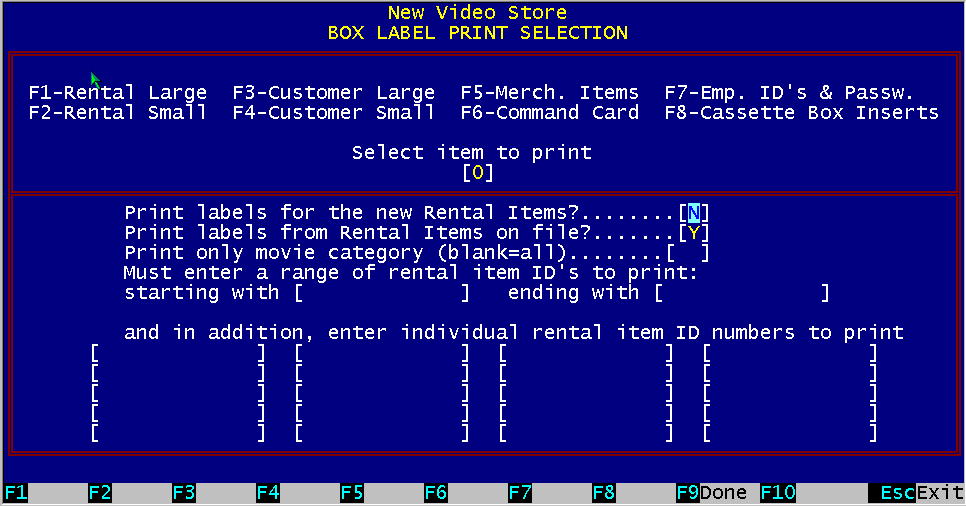
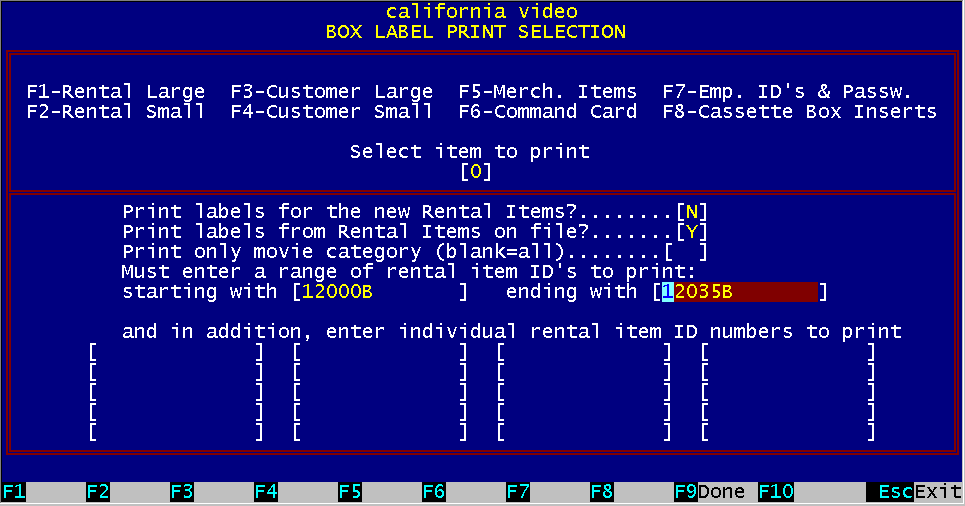
11.3 Printing Rental Item labels Figure 11.2 Printing Rental Item Labels
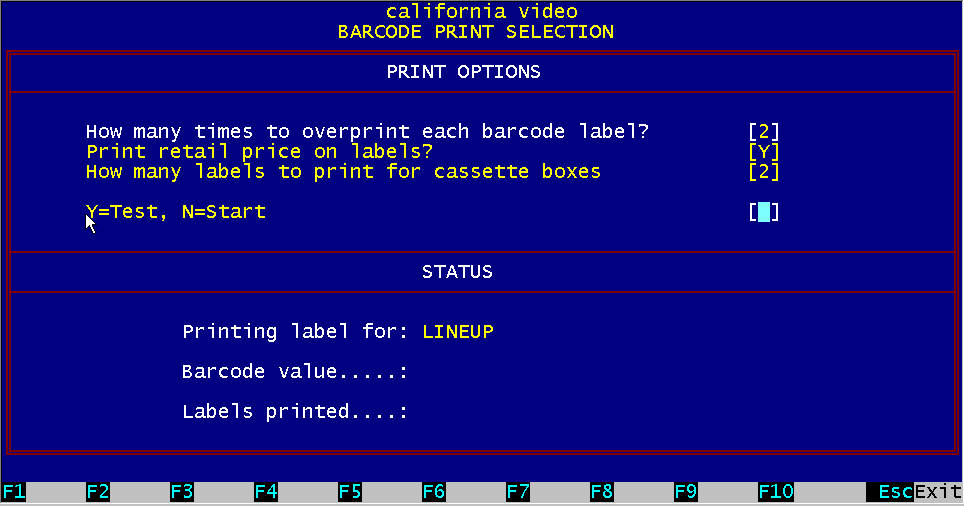
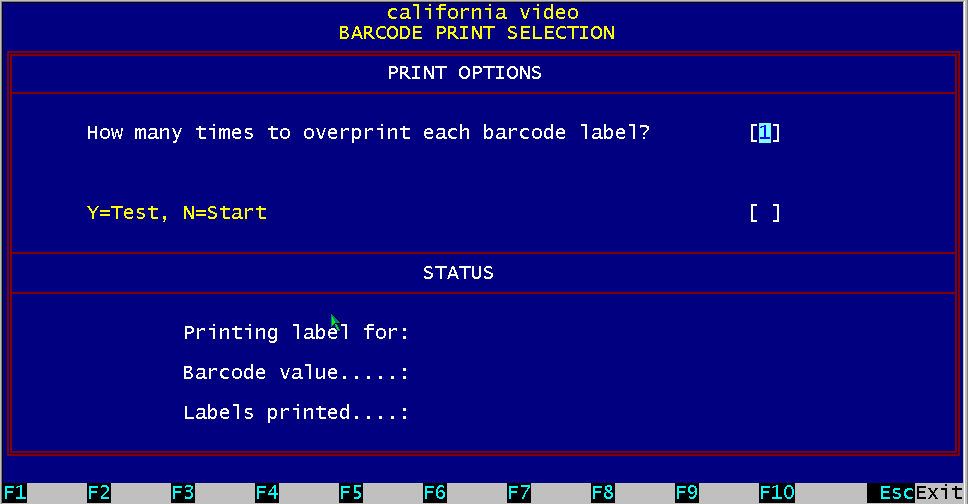
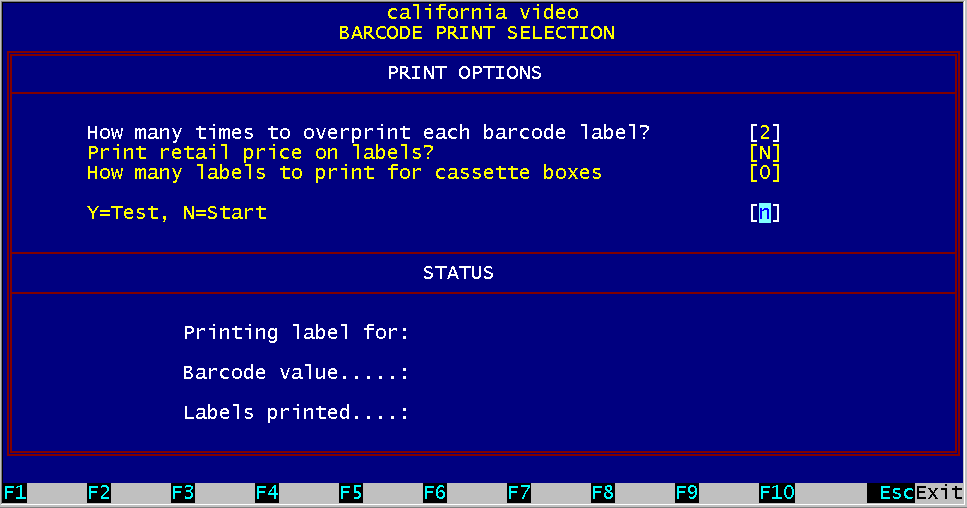
To print labels for rental items, select menu choice # 1 or #2. Menu choice #1 prints large size labels, 31/2" x 15/16" and menu choice #2 prints small size labels, 23/4" x 7/16", same size as the Customer ID labels. The bottom half of the screen will now display the "Rental Item" barcode printing selection screen. BizPie has a special feature to make it easy for you to print barcode labels for newly entered rental items. During initial system setup when you first start to use the system, you will be entering the thousands of tapes you own into the rental item inventory. You can now print barcode labels for all these rental items without having to specify the barcode numbers to use, by simply telling BizPie to print labels for "New Rental Items". Even though these are tapes you already have, they were just entered into the rental item inventory and are considered new tapes by BizPie. When you tell BizPie to print tapes for "New Rental Items", it uses a special data file that keeps track of tapes added to the system since the last time you printed barcode labels for "New Rental Items". The tape information to print barcode labels for newly entered rental items is stored in this separate data file and is used by the barcode label printing program. When the option is chosen to print labels for "New Rental Items", BizPie uses the data in this file as a guide to print the labels that are contained in it. As soon as these labels are printed, this file is cleared. Thus, if you add more new tapes, you can simply tell BizPie to print the labels for "New Rental Items" you have just entered. Therefore if you have just completed entering new rental items into the rental inventory and want to print barcode labels just for these new items, answer "Y" to: Print labels for the New Rental Items? .... [Y] You must also select to print these labels from the "Rental Items on File", where the selection is already defaulted to a "Y". Print labels from Rental Items on file?... [Y] If at this point all you want to do is to print barcode labels for newly entered rental items, press "Function Key F9" (Done), to indicate that you have completed your selection. If you also want to print replacement barcode labels for existing tapes in your inventory at the same time, (due to damage by coffee spills, etc.) you can enter a range of additional rental item numbers to printing. You would enter a range of rental item ID's, from the lowest to the highest. NOTE: These items MUST already be in the rental inventory. In addition, enter a range of rental item ID numbers to print, starting with [ ] and ending with [ ] If these fields are left blank, they will be ignored. If you also want to print labels for individual tapes, you can enter up to 20 individual rental item numbers to print on these lines. These items do not have to be in inventory. In addition, enter individual rental item ID numbers to print. If these fields are left blank they will be ignored. To start printing the labels, press "Function Key F9". This will display another screen, the "Options" screen, which controls the printing of the labels. The first option allows you to print legible labels if the printer ribbon is worn by entering the number of times to overprint each line to produce a darker barcode. A typical value is 2. "How many timesto overprint each barcode label? [2]" The second option allows you to print the retail price on LARGE labels only. Small labels do not have the space to fit the retail price on them. "Do you want to print the retail price on the label? [Y]" A feature is provided to print labels that are placed on the outside of the storage boxes. These labels do not have barcodes on them. The only purpose is to identify the contents of the box. "How many labels to print for cassette boxes? [2]" BizPie allows you to print as many test labels as required. You can adjust the labels in the printer for proper alignment before starting to print the actual labels. "Press "Y" to print a test label, "N" to start printing" Once you are satisfied with the options you have selected, you can start printing the labels by typing an "N" in response to:
Figure 11.3 Barcode Print Options
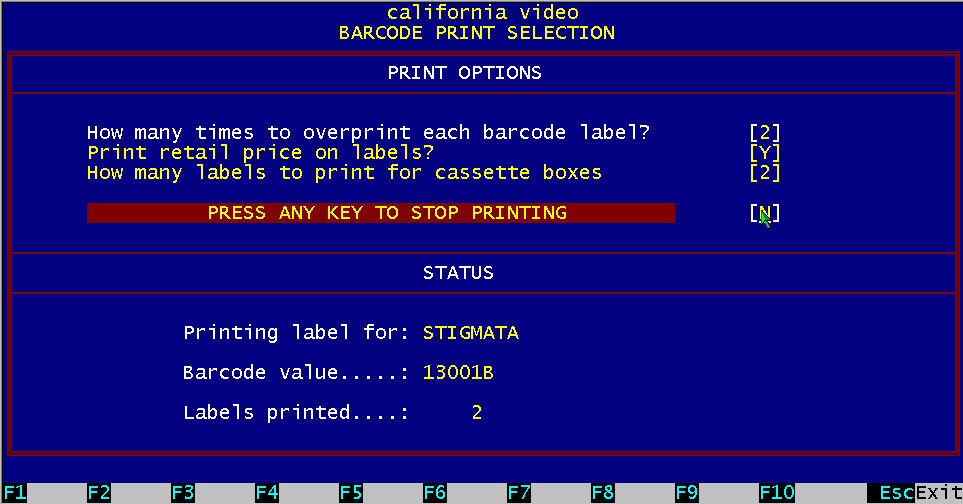
"Press "Y" for a Test Print, "N" to Start Printing" As printing begins, the bottom half of the screen displays the currently printing rental item name, the item ID and the total amount of labels printed for this run. The fourth line on the screen is replaced with the new message: Figure 11.4 Halt Barcode Printing
"Press ANY KEY to STOP printing" Pressing any key will temporarily pause the printer while the labels are printing. You may resume printing by entering "Y" to start printing. This feature is there in case of a paper jam, or you have to adjust the printer, etc. To continue, just answer "N' to "Start Printing" and the printer will resume where it left off. If you want to abandon printing, press the "ESC"' key. If you tell BizPie to halt printing, the data may already have been sent to the printer. The printer in effect stores the data in its own buffer and will not stop printing immediately after you ask it to do so. Once the data is in the "Printer Buffer", it has to finish printing it to empty it out. If you do not want to wait for the labels to finish printing, you can clear the "Printer Buffer" by turning off the printer. When you turn on the printer, the "Print Buffer" will be empty.
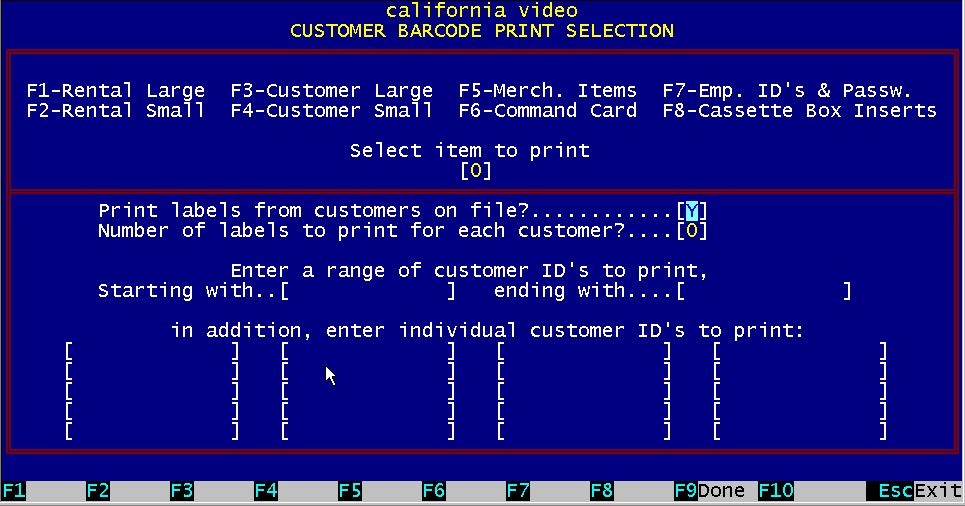
Figure 11.5 Printing Customer Labels
Customer ID barcode labels may be printed prior to issuing them to a customer, or printed from the customer file.
It is recommended that you preprint the customer labels. With the preprinted labels an employee does not have to take time out to print them, thus the
customer can take a new membership card immediately. To print labels for customer ID's, select "Print Barcode Labels", Management Menu #5.
The bottom half of the screen will now display the "Customer ID" selection screen. Print labels from customer on file?
[N]
Select "N" to allow you to preprint customer labels. Enter a range of customer ID's to print labels for.
Starting with [ ] ending with [ ]
In addition, you may choose individually to print up to 20 different customer ID's. If these fields are left blank, they will be ignored.
When you are ready to start printing the labels you have selected, press "Function Key F9". The system will now display the "Options" screen which
controls printing of the labels.
Figure 11.6 Customer Barcode Print Options
The "Options" screen allows you to enter information which controls only the printing of the labels. These options are the same as the ones presented to you for printing "Rental Item" barcode labels.
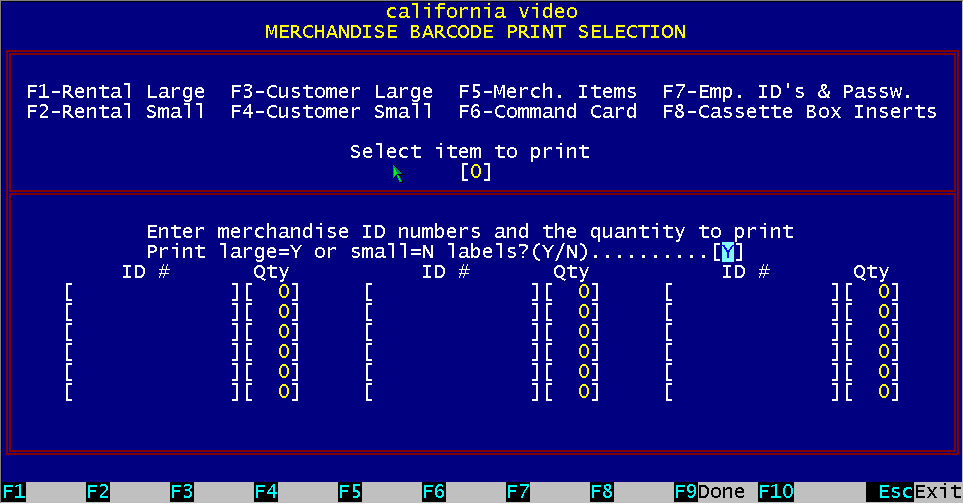
11.5 Printing Merchandise Labels Figure 11.7 Printing Merchandise Labels
To print labels for merchandise items, select "Print Barcode Labels", Management Menu #5. The bottom half of the screen will now display the "Merchandise Item" selection screen. This section is designed to print labels for retail merchandise items that do not have manufacturer preprinted UPC barcode labels on the container the product came in. These barcodes are assigned in the "Enter/Modify Merchandise Items" section of BizPie before entering the "Print Barcode Menu". Enter merchandise item numbers and quantities for each item number to print labels for. You have space to print up to 18 different items. If you want to start printing labels, pressing "Function Key F9" will display the "Options" screen, which controls printing of the labels. The "Options" half of the screen allows you to enter information which controls only the printing of the labels. These options are the same as the ones presented to you for printing "Rental Item" barcode labels.
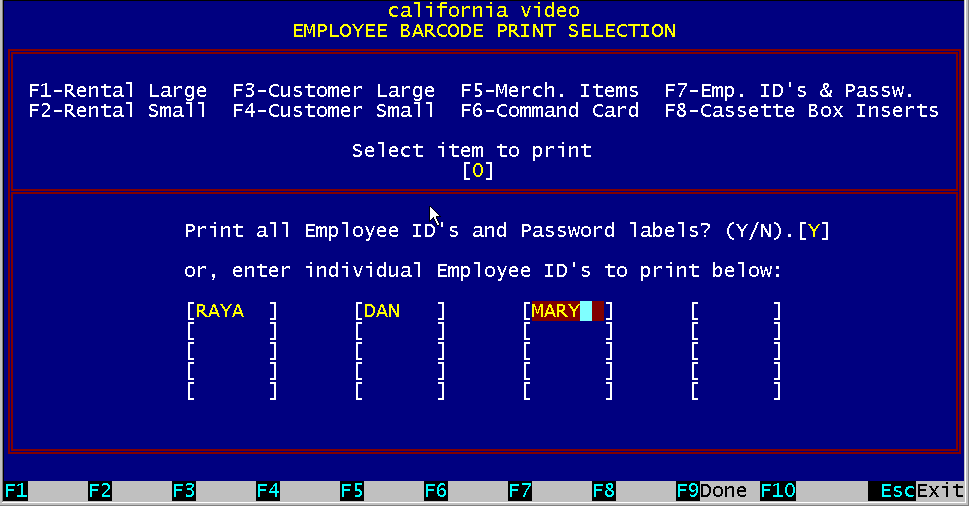
11.6 Employee ID's & Passwords
Figure 11.8 Employee ID's & Password
There are two types of barcode labels that may be printed for each employee. The first one is the "Employee ID" label and the second one is the "Employee Password" label. These labels may be placed onto an employee ID card to provide a high measure of security for the management of the business. These barcode labels can be printed only after you have entered the "Employee ID's" and "Passwords" with access levels (passwords and access levels are optional), in "Management Menu #4, Access Levels & Passwords" section (Ch. 10, P.2.) Employee ID label can be printed independently of the employee password labels. When the Employee ID barcode label is printed, the ID that was entered in the 'Access Levels & Passwords" section is printed under the barcode. When the Employee Password barcode label is printed, only the words "Password for PETE" is printed under the barcode. The actual password is not printed on this label. It appears only in the barcode. This password is the same as the one the employee would enter when using the keyboard at the POS section. This is a convenient way of entering the employee password without having to constantly type it in. The employees must treat this password as if it was a credit card. They should be responsible for them and report it to the management immediately if lost. To print labels for employee ID's and passwords, select "Print Barcode Labels, Management Menu #5". Then select barcode print menu option #5, "Employee ID's & Passwords". BizPie will now ask for your password. If you are authorized to use the 'Access Levels and Passwords" part of the system in the "Management Menu" section, you must type in your password to continue. If the access level of your password matches the access level required to permit you to print labels, you will be allowed to access the "Print barcode labels for Employees' ID and Passwords" section.
The bottom half of the screen will now display the "Employee ID" selection screen.
In addition, you may choose individually to print up to 20 different employee ID's. These fields may be left blank.
When you are ready to start printing the labels you have selected, press "Function Key F9". The system will now display the "Options" screen which
controls printing of the labels. The "Options" half of the screen allows you to enter information which controls only the printing of the labels.
These options are the same as the ones presented to you for printing "Rental Item" barcode labels.
Figure 11.9 Printing Command Card
The "Command Card' provides. an easy way to duplicate all of the standard keys and the function keys on the keyboard using printed barcode labels. By scanning a barcode label for the function key it represent, the same task can be performed as pressing the actual function key, without having to hunt around the keyboard for the correct key to press. These labels can be attached to a standard size sheet of plastic and placed next to the keyboard.
11.8 Printing Cassette Box Insert Figure 11.10 Printing Cassette Box Insert
BizPie has the capability of printing the inserts that are placed in the sleeves of the rental box if you have "live" inventory. You have the same capability to print and select items as for the barcodes. You can print only one sleeve, or as many as necessary. To print the inserts for cassettes, select menu choice #8. The bottom half of the screen will now display the "Rental Item" barcode printing selection screen. BizPie has a special feature to make it easy for you to print cassette inserts for newly entered rental items. During initial system setup when you first start to use the system, you will be entering the thousands of tapes you own into the rental item inventory. You can now print cassette inserts for all these rental items without having to specify the barcode numbers to use, by simply telling BizPie to print labels for "New Rental Items".
Figure 11.11 Printed Cassette Insert
Even though these are tapes you already have, they were just entered into the rental item inventory and are considered new tapes by BizPie. When you tell BizPie to print tapes for "New Rental Items", it uses a special data file that keeps track of tapes added to the system since the last time you printed cassette inserts for "New Rental Items". The tape information to cassette inserts labels for newly entered rental items is stored in this separate data file and is used by the cassette insert printing program. When the option is chosen to print inserts for "New Rental Items", BizPie uses the data in this file as a guide to print the inserts that are contained in it. As soon as these inserts are printed, this file is cleared. Thus, if Printing Barcode Labels Printing Cassette Box Insert you add more new tapes, you can simply tell BizPie to print the inserts for "New Rental Items" you have just entered. Therefore if you have just completed entering new rental items into the rental inventory and want to print cassette inserts just for these new items, answer "Y" to: Print inserts for the New Rental Items? ....[Y] You must also select to print these inserts from the "Rental Items on File", where the selection is already defaulted to a "Y". Print labels from Rental Items on file?... [Y] If at this point all you want to do is to print cassette inserts for entered rental items, press "Function Key F9" (Done), to indicate that you have completed your selection. If you also want to print replacement cassette inserts for existing tapes in your inventory at, the same time, (due to damage by coffee spills, etc.) you can enter a range of additional rental item numbers to printing. You would enter a range of rental item ID's, from the lowest to the highest. NOTE: These items MUST already be in the rental inventory. In addition, enter a range of rental item ID numbers to print, starting with [ ] and ending with [ ] If these fields are left blank, they will be ignored. If you also want to print inserts for individual tapes, you can enter up to 20 individual rental item numbers to print on these lines. These items do not have to be in inventory. In addition, enter individual rental item ID numbers to print. If these fields are left blank they will be ignored. To start printing the inserts, press "Function Key F9". This will display another screen, the "Options" screen, which controls the printing of the labels. The first option allows you to print legible inserts if the printer ribbon is worn by entering the number of times to overprint each line to produce a darker barcode. A typical value is 2. "How many times to overprint each cassette insert? [2]" The second option allows you to print the retail price. "Do you want to print the retail price on the insert? [Y]" Printing Cassette Box Insert Printing Barcode Labels "Press "Y" to print a test insert, "N" to start printing" Once you are satisfied with the options you have selected, you can start printing the inserts by typing an "N" in response to: "Press "Y" for a Test Print, "N" to Start Printing" As printing begins, the bottom half of the screen displays the currently printing rental item name, the item ID and the total amount of inserts printed for this run. The fourth line on the screen is replaced with the new message: "Press ANY KEY to STOP printing" Pressing any key will temporarily pause the printer while the inserts are printing. You may resume printing by entering " Y" to start printing. This feature is there in case of a paper jam, or you have to adjust the printer, etc. To continue, just answer "N" to "Start Printing" and the printer will resume where it left off. If you want to abandon printing, press the "ESC" key. If you tell BizPie to halt printing, the data may already have been sent to the printer. The printer in effect stores the data in its own buffer and will not stop printing immediately after you ask it to do so. Once the data is in the "Printer Buffer", it has to finish printing it to empty it out. If you do not want to wait for the labels to finish printing, you can clear the "Printer Buffer" by turning off the printer. When you turn on the printer, the "Print Buffer" will be empty. |
|||||||||||||||||||||||||
|
|||||||||||||||||||||||||
|
|
|||||||||||||||||||||||||
|
|||||||||||||||||||||||||
| [BizPie] [About Us] [Sales Information] [Service] [What's New] [SiteMap] | |||||||||||||||||||||||||
Please contact our Webmaster with questions or comments. |
|||||||||||||||||||||||||